
The modern music production landscape is a dichotomy: the limitless flexibility of the digital world versus the rich, sonic character of analog hardware. Every in-the-box (ITB) producer eventually hits a wall, hearing that clinical, transparent sound and asking the same question: “How can I inject genuine analog warmth into my digital mixes?” The answer is not in spending thousands on outboard gear, but in mastering the use of Analog Warmth Plugins. This ultimate guide reveals the proven secrets used by expert engineers to crush the digital barrier, ensuring your mixes have the depth, punch, and sonic glue previously reserved for million-dollar studios.
The Physics of Analog Warmth: Why Digital Sound Lacks Depth
Before you can fix the problem, you must understand it. The reason pure digital audio sounds “cold” or “harsh” is due to its perfect, clinical nature. Digital clipping is an abrupt, square-wave distortion that is instantly jarring. Analog equipment, however, handles high signals gracefully. When pushed, components like tubes, transformers, and magnetic tape introduce subtle, non-linear distortion—specifically harmonic distortion and transient rounding—that is musical and pleasing to the human ear. This subtle layer of imperfection, or analog warmth, is what adds depth and three-dimensionality.
The Non-Linear Magic of Analog Circuits
Analog gear does not treat all frequencies or volumes equally. As the signal gets hotter, the response curve gently rounds the waveform’s peaks, generating even-order harmonics that are musically consonant and perceived as “fatness” or “warmth.”
Transient Rounding and “Glue”
Analog devices slightly round off sharp transients (the initial spike of a kick drum or snare). While digital is perfect, analog equipment acts as a subtle compressor, which helps disparate tracks blend or “glue” together more cohesively.
The Myth of Perfect Digital Audio
While digital audio boasts superior noise floor and frequency response compared to tape, its perfection is its flaw. It lacks the subtle, cumulative coloration that makes classic records sound so rich.
Comparison of analog and digital recording: https://en.wikipedia.org/wiki/Comparison_of_analog_and_digital_recording
Analog Warmth Plugins: The Essential Categories
To bring this warmth ITB, producers rely on five essential categories of Analog Warmth Plugins. Every plugin you use should be chosen for its specific role in emulating a piece of hardware, not just for a cosmetic effect.
Console Emulations (The Summing Effect)
These plugins model the signal chain of classic consoles (Neve, SSL, API), including the inherent noise and frequency response of each channel and the master bus summing. They are best used lightly on every channel to build cumulative coloration.
Tape Saturation Plugins
These are arguably the most effective tools for analog warmth plugins. They emulate the magnetic tape process, adding compression, high-frequency rolloff, and a specific noise floor. They are crucial for creating sonic glue.
Tube and Transformer Preamps
Used primarily on individual tracks, preamp emulations simulate the input stage of high-end outboard gear. They are the go-to choice for adding focused girth, presence, and grit to vocals, bass, and drums.
Vintage EQ and Compressor Models
Emulations of hardware like the Pultec EQ or the Fairchild compressor impart their unique, non-linear phase and frequency characteristics, adding color even when set to seemingly flat or minimal settings.
Multiband Saturators
Plugins like Soundtoys Saturn allow you to apply specific harmonic distortion types (tube, tape, digital, etc.) to specific frequency bands, giving you surgical control over where the analog warmth plugins effect is applied.
Secret #1: Mastering the Transformer and Tube Emulation
The transformer is often the unsung hero of analog gear. It’s a core source of analog warmth and subtle low-end punch. Using a dedicated transformer or tube emulation plugin is the simplest way to inject real analog character.
The Power of the Input Gain Stage
The core technique is to drive the plugin’s virtual input transformer just to the point of subtle saturation. This sweet spot, often marked in yellow or red on the interface, is where the even-order harmonics are generated.
Pre-EQ vs. Post-EQ Placement
Place your tube/transformer emulation before your surgical EQ. This allows you to sculpt the tone after the harmonic distortion has been generated, ensuring you are shaping the warm, harmonically rich signal, not the clean one.
Subtle Saturation on Bass and Vocals
For bass, drive the preamp hard to introduce low-mid harmonics that make the bass translate better on small speakers. For vocals, a gentle push on a vintage preamp emulation adds intimacy and presence.
Best free VST plugins for Trap and RNB: https://wtmhstudio.com/the-10-best-free-vst-plugins-for-trap-rnb-production/
The Ultimate Guide to Tape Saturation Techniques
Tape saturation is the single best tool for gluing a mix together and delivering that classic, cohesive sound. It adds compression, density, and a pleasing high-frequency softness.
The “Tape on Everything” Approach
Apply a subtle tape saturation plugin (like a Studer or Ampex emulation) to every track and the master bus. The cumulative effect of these gentle applications is the true secret to analog warmth plugins cohesion.
Tape Speed and Bias Selection
- Tape Speed: Use 15 IPS (Inches Per Second) for thicker low-end and more warmth, or 30 IPS for more clarity and a slightly cleaner high-end.
- Bias: Increasing the bias control pushes the signal harder, adding more high-frequency saturation and grit. Use this sparingly on drums for aggressive punch.
Creating a Realistic Noise Floor
Some tape plugins include a noise control. Don’t be afraid to introduce a tiny amount of tape hiss (often around -70 dBFS) on your master bus. This subtle, constant noise floor masks digital silence and adds to the perception of analog character, much like what you hear in classic historical perspective on tape saturation.
Console Emulation for ITB Mixing: The Glue & Summing Myth
The myth is that digital summing sounds inherently worse than analog summing. The reality is that the difference isn’t the summing itself, but the coloration added by the console’s channel strips and bus electronics.
Building Your Virtual Console
Use a console emulation plugin on every channel. Most models allow you to select a different virtual channel number for each track. This mimics the slight component variations across a real console, preventing a sterile, uniform sound.
Driving the Master Bus
The final layer of glue is applied at the master bus. Insert the console’s master bus plugin emulation and push the input level until you see the saturation light gently flickering. This final push rounds transients and adds the mix’s unifying “sheen.”
Pre-Fader Inserts for Realism
For true realism, place the console emulation plugin as a pre-fader insert. This ensures the volume fader is placed after the coloration stage, replicating the actual signal flow of a hardware console.
Creative Use of Harmonic Distortion for Depth and Punch
Harmonic distortion is the engine of analog warmth plugins. Knowing where to place it is key to making your drums punch and your bass rumble.
The Subtlety of Parallel Saturation
Send your drums or bass track to an FX return channel. Insert a high-quality saturator or distortion plugin on the return, drive it aggressively, and then mix this distorted signal back in with the dry signal at a low level. This technique adds perceived loudness and aggressive character without destroying the transient of the original sound.
Targeting Drums and 808s
For 808s, distortion should be applied to the mid-frequencies (100 Hz – 300 Hz) to create harmonics that allow the sub-bass to be heard on smaller speakers. For snares, a touch of gentle distortion adds aggression and helps them cut through the mix.
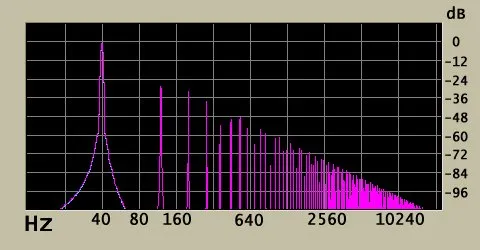
Using Harmonics to Create Space
Different distortion types generate different harmonics. Even-order harmonics are warm and smooth, while odd-order harmonics are more aggressive and aggressive. By strategically applying these, you create distinct sonic spaces for instruments. See the difference between odd and even harmonics in the .
The Subtle Art of Analog Compression (Beyond Loudness)
Analog compression, particularly variable-mu (like a Fairchild) or opto-compressors (like an LA-2A), adds more than just gain reduction; it adds color. This color is the true source of analog warmth plugins reputation in compression.
The LA-2A: Slow and Smooth
The LA-2A emulation is perfect for vocals, bass, and pads. Its slow attack and release times are program-dependent, preventing harsh transients and delivering a buttery, smooth sound that sits perfectly in the mix.
The 1176: Aggression and Tone
The 1176 is the opposite: fast and colorful. Use it to shape the attack of a kick drum, or apply the famous “all buttons in” setting for aggressive, pumping room mics. The FET circuitry adds a distinct, edgy tone.
Sidechaining for Genre Punch
In genres like Afrobeat and Dancehall, the rhythm is everything. Use gentle compression on your synth pads or music beds, sidechained to the kick drum, to create a subtle, rhythmic volume drop that enhances the groove and locks the music into the riddim.
Selecting the Best Analog Warmth Plugins for Your Genre
Choosing the right emulation is crucial, especially when working on specific genres where certain hardware defined the sound.
Trap and RNB Essentials
For modern Trap and RNB, focus on transformer-based preamps (like API or Neve emulations) for hard-hitting drums and aggressive vocal presence. These genres require punch and clarity. To enhance the low-end, you must select high-quality analog warmth plugins.
The Afrobeat & Dancehall Blueprint
Afrobeat and Dancehall rely heavily on a warm, thick low-end and pronounced mid-range percussion. Use tape saturation and Pultec-style EQs on your drum buses to add body and ensure the rhythmic elements blend. For the best rhythms, you need to invest in essential Afrobeat packs and kits and advanced Dancehall drum kit packs to start with high-quality samples.
House and Techno Clarity
These electronic genres require powerful transients but benefit from mid-range warmth. Use console emulations and subtle tape on the master bus to create cohesion, while preserving the punch of your digital kicks and hi-hats.

Advanced: Analog Saturation vs Digital Clipping
While we recommend analog saturation plugins for warmth, there are creative uses for digital clipping that every elite producer should know.
The Transfer Curve Difference
Analog saturation utilizes a soft-knee transfer curve, resulting in the graceful analog warmth plugins compression and harmonic generation. Digital clipping is a brick-wall, hard-knee curve that instantly truncates the signal. Read up on understanding the difference between soft and hard clipping for a deep dive into the technical details.
Creative Digital Clipping on Drums
Digital clipping can be an effective tool on drums, particularly kick and snare. By applying a soft digital clipper (or an aggressive saturator set to clip) you can shave off the peak transients, creating perceived loudness that helps the drums punch through the mix without hitting 0 dBFS.
Mastering Applications
Many modern mastering engineers use a very subtle amount of analog-modeled soft clipping before the brickwall limiter. This helps to reduce the peak information heading into the final limiter, allowing the limiter to work less aggressively and resulting in a louder, more transparent final master.
Understanding the difference between soft and hard clipping: https://www.izotope.com/en/learn/what-is-soft-clipping
Building Your ITB Analog Chain: A Step-by-Step Workflow
Implementing a coherent analog workflow ITB is about consistency. Follow this chain on all major buses to achieve immediate results.
- Input/Source: Insert a Preamplifier/Channel Strip Emulation (Tube/Transformer) to inject foundational color.
- Dynamics: Insert a Vintage Compressor Emulation (LA-2A or 1176) for tone and subtle dynamic control, not extreme gain reduction.
- EQ: Insert a Vintage EQ Emulation (Pultec, API) for broad, musical tone shaping.
- Send: Apply Tape Saturation to your drum and main instrument buses for glue.
- Master Bus: Insert a Console Master Bus Emulation followed by a gentle analog saturation plugin for final cohesion. This mirrors advanced routing features in your DAW to create a true virtual console.
Tn-depth guide on advanced Trap mixing techniques: https://wtmhstudio.com/trap-mixing-advanced-techniques/
Conclusion (Analog Warmth Plugins)
Achieving a professional, Analog Warmth Plugins signature sound no longer requires a second mortgage for a vintage console. By understanding the physics of harmonic distortion, transient rounding, and the subtle color of hardware components, you can use modern Analog Warmth Plugins to craft mixes with unparalleled depth and punch. Focus on consistent application of subtle saturation across every track to build that sought-after cohesive sound. Now, go forth and mix like the analog legends of old!
Frequently Asked Questions (Analog Warmth Plugins)
Q: What is the single most important plugin for getting analog warmth?
The tape saturation plugin is often considered the most effective tool in Analog Warmth Plugins. Its effect on high frequencies, transient rounding, and harmonic generation gives the quickest, most noticeable “analog glue” effect across an entire mix, making it essential for achieving true analog warmth plugins.
Q: Should I use analog warmth plugins on every track?
Yes, using subtle saturation and console emulations on every single track is the core secret. Analog consoles impart a small, unique color on every channel, and the cumulative effect of this subtle processing across dozens of tracks is what creates the characteristic “analog sound.”
Q: Is “in-the-box” (ITB) audio worse than analog (OTB)?
Neither is inherently “worse.” ITB audio offers perfect precision and recall, while OTB (Out-The-Box) offers non-linear coloration and hands-on workflow. The modern elite producer uses Analog Warmth Plugins to combine the flexibility of ITB with the sonic character of OTB.
Q: What is the difference between tape saturation and distortion?
Tape saturation is a specific form of distortion caused by overloading magnetic tape, characterized by soft clipping and primarily even-order harmonics (Analog Warmth Plugins). Distortion is a broader term that includes everything from gentle clipping to harsh fuzz and usually involves aggressive odd-order harmonics (Analog Warmth Plugins).
Q: What is the ideal LUFS target when mixing with analog warmth plugins?
The introduction of analog saturation inherently increases the perceived loudness and density of your mix. The current integrated standard for streaming services is around -14 LUFS. However, when using saturation, ensure your true peaks remain below -1.0 dBTP to avoid issues during codec conversion.
Q: Do I need expensive plugins, or can I use stock DAW plugins for analog warmth?
While high-end, carefully modeled Analog Warmth Plugins offer superior results, you can start with stock tools. Many DAWs include subtle saturators Analog Warmth Plugins, basic clippers, and stock compressors that, when used in parallel and in the signal chain sequence described, can still achieve noticeable levels of analog character.