
The “Loudness War” may be over, but the pursuit of loud, punchy, and professional audio is eternal. In 2025, being competitive on streaming platforms is not about crushing your tracks to maximum volume; it is about achieving Competitive Mastering—a delicate, advanced blend of loudness, transparency, and dynamic control.
Most producers and engineers still rely on outdated techniques, resulting in masters that sound aggressive in the studio but quiet, distorted, or simply weak once they hit Spotify or Apple Music. This guide is your ultimate blueprint for avoiding destruction while maximizing impact. We are moving beyond the basic limiter settings to reveal the 7 advanced secrets, the critical metrics, and the genre-specific techniques required to create masters that sound incredible everywhere.
This comprehensive, 7-step guide will transform your approach to the final stage of music production. If you want to future-proof your sound and deliver masters that stand shoulder-to-shoulder with top-tier releases, mastering these advanced techniques for Competitive Mastering is essential.
What is Competitive Mastering in the Streaming Era?
Mastering is the crucial final step that prepares a mixed track for distribution. In the past, this meant simply making it as loud as possible (the “Loudness War”). Today, the game has changed entirely due to normalization. Competitive Mastering is the art of maximizing perceived loudness and tonal balance before the stream normalization algorithms are applied.
Defining the Modern Loudness War (LUFS vs. RMS)
The industry has largely transitioned from measuring loudness using RMS (Root Mean Square) to LUFS (Loudness Units Full Scale).
- RMS is a simple average of the signal level, which doesn’t accurately represent human hearing. It is a dated metric for final loudness assessment.
- LUFS is an advanced standard that uses K-weighting filters to closely mimic how the human ear perceives loudness. This makes it the only reliable measurement for modern mastering.
The term “loudness war” has morphed. Instead of competing on absolute peak volume, the battleground is now dynamic range and punch, ensuring your track sounds consistently loud and clear at a normalized LUFS level.
Why Your Masters Sound Quiet on Spotify and Apple Music
Streaming services use normalization to bring all tracks to a consistent volume target, typically between -14 LUFS and -16 LUFS Integrated.
- If your master is significantly louder (e.g., -8 LUFS), the service turns it down to -14 LUFS, potentially exposing artifacts like harsh limiting.
- If your master is much quieter (e.g., -20 LUFS), the service turns it up, but this is rare and can sometimes amplify noise floor issues.
The core goal of Competitive Mastering is to deliver a track at an appropriate loudness (often -9 LUFS to -12 LUFS for pop/EDM, or even louder for some genre extremes) that has the optimal transient punch and tonal balance so that when it is turned down, it retains maximum impact.
The Critical Role of Loudness Standards (Target LUFS Explained)
The first secret to successful Competitive Mastering is knowing your target. While platforms normalize to different degrees, aiming for a range is best.
- Spotify, Apple Music, YouTube: Approximately -14 LUFS Integrated.
- Tidal (Hi-Fi): Usually around -14 LUFS.
- CD/Vinyl: Still often much louder, sometimes reaching -9 LUFS or higher.
The current recommended sweet spot for maximum perceived loudness before normalization is typically -10 to -12 LUFS Integrated. You must check the official LUFS guidelines for major streaming platforms (Spotify/Apple Music for Developers) to stay up-to-date, as these standards change.
The Essential 3-Stage Competitive Mastering Chain
A professional Competitive Mastering chain is structured to handle three distinct processes: tonal shaping, dynamic control, and loudness maximization. Approaching it randomly leads to destruction.
Stage 1: The Transparent EQ and Mid-Side Processing
Start with subtraction, not addition. Use a high-quality linear phase EQ to remove problem frequencies (resonance, rumble) that accumulate during the mixing process.
- Subtractive EQ: Look for narrow boosts in the mid-range or excessive low-end buildup.
- Mid-Side (M/S) Magic: This is critical. Use M/S processing to treat the central (Mono) and peripheral (Stereo) signals independently. You can tighten the low-end by slightly narrowing the bass frequencies in the ‘Side’ signal, giving you a clearer, punchier kick and bass in the mono field.
A proper M/S strategy ensures your track translates well on mono playback systems, a non-negotiable step in modern mastering.
Stage 2: Multi-band Compression for Tonal Balance
Multi-band compression (MBC) is one of the most powerful—and dangerous—tools in the mastering chain. It is used for fixing tonal imbalances that a broadband compressor cannot address. Following best practices for using multi-band compression in mastering is essential to avoid destroying your dynamics.
- Targeted Taming: Use MBC to gently control harsh high-mids or loose low-mids only when they cross a specific threshold. Do not use it as an always-on “tone shaper.”
- Gentle Ratios: Use low ratios (e.g., 1.2:1 to 1.5:1) and slow attack/release times to avoid pumping. The goal is subtle dynamic smoothing, not heavy-handed genre definition.
For tracks that originated from a dense mix, particularly those requiring advanced trap mixing techniques to keep the 808s and synths clear, multi-band compression in the mastering stage can provide that final, crucial clarity.
Stage 3: Harmonic Excitation and Saturation (The Secret Sauce)
This is the secret to adding perceived loudness and excitement without pushing the limiting stage too hard. Saturation adds harmonic content that the ear perceives as louder and richer.
- Analog Emulation: Use high-quality analog-modeled tape or tube saturation plugins. They add warmth and glue the mix together.
- Targeted Saturation: Sometimes, applying saturation subtly before the main limiter helps the limiter work less hard, as the saturated signal is more uniform in volume. This is a key technique in advanced Competitive Mastering.

Advanced True Peak Limiting Techniques (Loudness Without Destruction)
The single most critical factor in achieving Loudness Without Destruction is the final limiter. If you are still setting your ceiling to 0.0dBFS, you are introducing destruction.
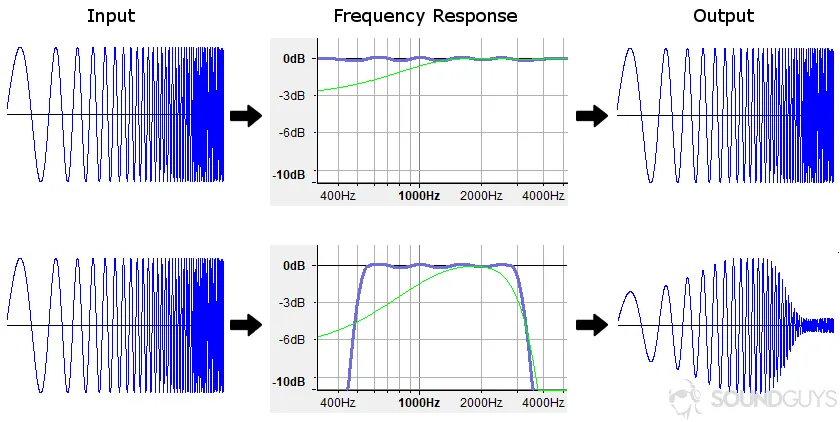
Understanding Inter-Sample Peaks and Oversampling
When a digital audio signal is converted back to analog for playback (on a phone, laptop, or speaker), the reconstruction filter can create new peaks higher than the measured digital peak. These are Inter-Sample Peaks (ISPs), and they are the main cause of clipping and harsh distortion on a listener’s system.
- Oversampling: High-quality limiters use oversampling (e.g., 4x or 8x) to analyze the waveform at a much higher resolution, allowing them to predict and compensate for ISPs before they occur. Always engage oversampling in your final limiter.
Setting the Absolute Ceiling: The -1.0 True Peak Rule
To guarantee that your master never clips on any playback system, you must set the ceiling based on True Peak measurement, not just digital peak.
- The Golden Rule: Set your limiter’s output ceiling to -1.0 dB True Peak (dBTP).
- This -1.0 dBTP buffer is the essential safeguard against ISPs, ensuring the track remains clean even after being normalized by a streaming service. This practice is now mandated by the latest standards outlined by the AES, covering the historical development and current standards of True Peak Limiting (Audio Engineering Society).
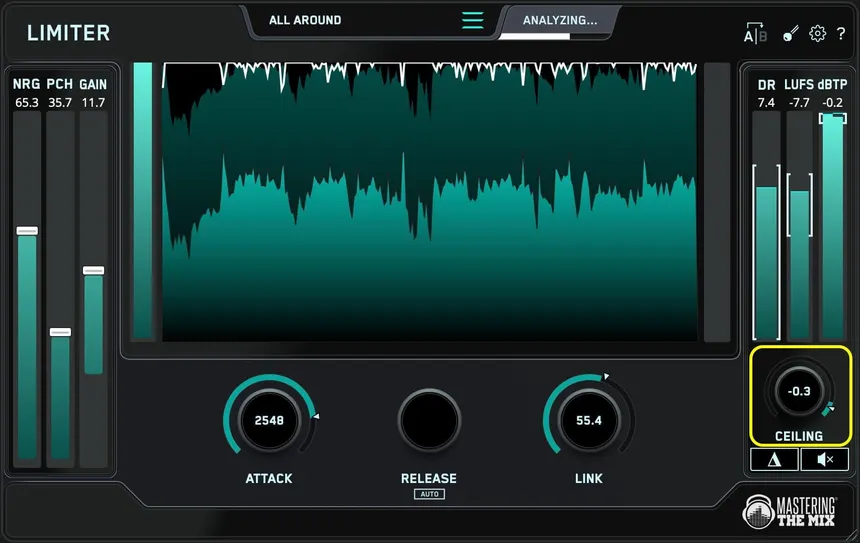
Choosing the Right Limiter for Transparent Gain
The limiter is the final gateway for your dynamics. Your choice of limiter will dictate the transparency of your loudness.
- Soft Clipping vs. Hard Limiting: Use a quality soft-clipper before the main limiter to shave off the loudest transients, allowing the main limiter to work more gently.
- Lookahead: Lookahead circuits allow the limiter to “see” the transient coming and react proactively. High-quality limiters have advanced, minimal lookahead that avoids artifacts.
The Secret to High-Impact Low-End in Competitive Mastering
For genres centered on powerful bass, like Trap, Afrobeat, and Amapiano, the low-end is often the make-or-break element of a Competitive Mastering job. Loudness is easy; clear loudness is the secret.
Mastering the 808/Kick Relationship (Phase Coherence)
The biggest low-end problem is phase cancellation between the kick drum and the bass/808. In the mastering stage, this often presents as a weak or ‘flabby’ mono signal.
- M/S Filter: Use M/S EQ to make everything below 100Hz completely mono. This tightens the low-end and creates a focused, powerful center image.
- Phase Correlation: Monitor your correlation meter. If the needle consistently dips into the negative (out-of-phase) territory, your low-end will collapse when summed to mono. You must return to the mix to correct phase issues, as mastering is too late for drastic phase repair.
Low-End Multi-band Limiting and Clipper Tactics
Traditional limiters compress the entire signal, forcing the low-end to duck when the high-mids hit. Advanced Competitive Mastering techniques use multi-band control.
- Low-Band Control: Use a high-quality multi-band limiter (separate from your MBC) to apply gentle limiting only to the sub-bass frequencies (e.g., 20Hz-60Hz). This allows you to push the bass without destroying the entire track’s dynamics.
- Low-End Clipping: Strategic use of a clean clipper plugin on the sub-bass frequencies can add a small amount of extra loudness and saturation without being perceived as distortion. The use of an advanced guide to sidechain compression in the mix can also significantly reduce low-end build-up that complicates this stage.
Psychoacoustic Bass Enhancement Tools
Some subtle tools can be used to make the low-end perceived as louder on small speakers without adding physical volume.
- Harmonic Generators: These tools generate subtle, musically related harmonics in the mid-range based on the low-end signal. Because small speakers can’t reproduce the sub-bass, the brain hears these harmonics and fills in the perceived bass tone. This ensures your powerful low-end translates.
Workflow Hacks: Testing and Analyzing Your Competitive Mastering
Even the most advanced techniques fail if you cannot objectively test the result. Professional Competitive Mastering is a scientific process requiring specific tools and methods.
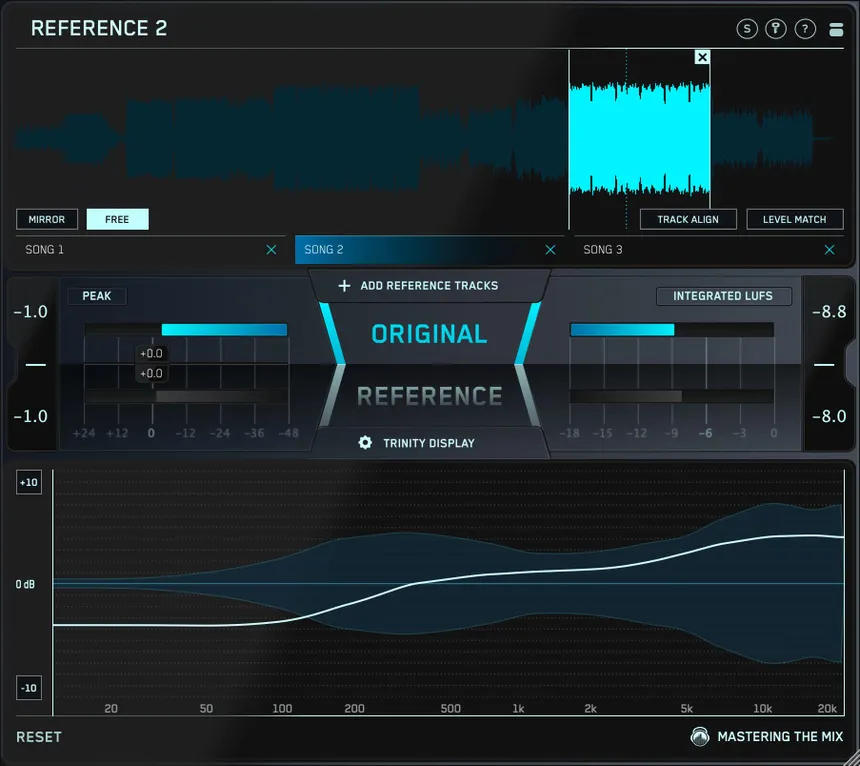
Referencing with Commercial Tracks (The A/B/X Method)
The A/B/X method is the gold standard for referencing. It is the only way to eliminate ear fatigue and confirmation bias.
- A/B/X Setup: Set up your DAW so you can instantly switch between: A – Your Master, B – Your Pre-Master (the mix before mastering), and X – A Commercial Reference Track.
- Level Matching: The reference tracks must be level-matched to your master (to the same integrated LUFS value) to avoid the “louder-sounds-better” trick.
- What to Listen For: Focus on: 1) Tonal Balance (are the mids or highs too harsh?), 2) Transient Punch (is the reference punchier at the same volume?), and 3) Stereo Width (does the reference’s side information collapse or bloom?).
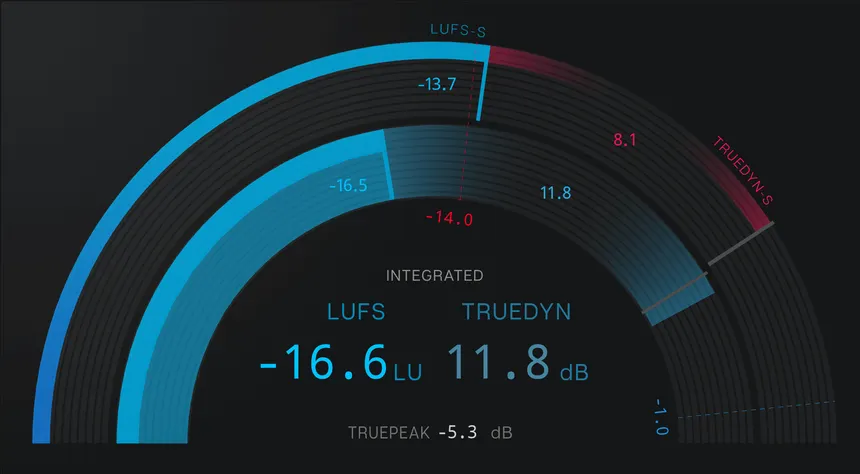
Metering Setup (LUFS, Correlation, and Spectrogram)
Your monitoring chain needs the right tools to confirm the technical compliance of your Competitive Mastering.
| Meter | Purpose | Target Check |
| Integrated LUFS | Total loudness average of the entire track. | Target: -10 to -12 LUFS Integrated. |
| True Peak Meter | The absolute signal ceiling. | Must not exceed -1.0 dBTP. |
| Correlation Meter | Checks mono compatibility. | Must stay positive (ideally above +0.5). |
| Spectrogram | Visualizes frequency over time. | Check for excessive high-end noise or sub-bass rumble. |
Testing Against All Major Streaming Platforms
After finalizing your master, use an online loudness penalty calculator tool (Youlean, Loudness Penalty website) or simply upload a short segment to an unlisted YouTube video. This confirms how the service’s normalization will treat your track before your official release. This step is non-negotiable for a professional Competitive Mastering workflow.
Mastering for Niche Genres (Trap, Amapiano, Afrobeat)
While the True Peak and LUFS standards are universal, the application of Competitive Mastering must be genre-aware.
Genre-Specific Loudness and Transient Requirements
- Trap: Requires extreme transient punch and a very low True Peak setting to accommodate the aggressive 808s and snares. The overall integrated LUFS can be pushed slightly higher (-9 LUFS) due to the sparser arrangements.
- Amapiano: Driven by the log drum, which needs space to breathe. The dynamic range is often more important than sheer volume. A slightly lower LUFS target (-11 LUFS) might preserve the unique groove better.
- Afrobeat: Requires space for the percussion and high-frequency elements. Focus on transparent limiting and clear high-mids. A deeper guide to Afrobeat drum kits and essential packs can highlight which sounds need the most dynamic consideration. We also have high-quality top 10 Amapiano drum kits to help you understand the core sounds that must be preserved.
Dealing with Unique Low-End Characteristics (Amapiano Logs, Trap 808s)
The biggest challenge is making sure the genre’s signature low-end translates. The log drum in Amapiano often occupies a wider frequency band than a standard kick/bass. This requires hyper-targeted MBC and a very careful eye on the correlation meter to ensure the mono log drum foundation remains solid. A deep dive into Afrobeat mixing and low-end balance can provide further insight.

Preserving the Vibe: The Balance of Volume vs. Dynamics
In the end, music is about emotion. If maximizing loudness kills the energy, the master has failed. Use your ears, not just your meters. A slightly quieter track with incredible dynamics will always sound better than a painfully loud, squashed track. A successful Competitive Mastering engineer knows where to draw that line.
Avoiding the 5 Common Competitive Mastering Mistakes
The path to Competitive Mastering is littered with simple, avoidable errors. Eliminate these, and you are instantly ahead of 90% of producers.
Over-processing in the Mix Stage
Mastering cannot fix a broken mix. The most common mistake is driving the mix bus too hard, leaving no headroom for the mastering engineer.
- Headroom Rule: Ensure your pre-master mix has a peak between -3 dBFS and -6 dBFS. This gives the mastering chain the necessary dynamic space to work without distortion.
Ignoring the Importance of Headroom
As mentioned, mixing too loud eliminates all possibility of a quality, dynamic master. If your kick hits -0.5 dBFS in the mix, your mastering engineer (or you) has almost no space to process. Always check the levels on professional studio headphones for mixing to ensure you are leaving enough space for the final limiting stage.
Relying on Simple Presets and Templates
A “Mastering Template” should only contain the signal chain (EQ > MBC > Limiter). It should never contain fixed settings. Every single song is different, and a preset is, by definition, an averaged, non-competitive result. Use your meters, use your ears, and customize every instance of your mastering chain.
Conclusion: The Future of Loudness and Dynamics
The modern guide to Competitive Mastering is defined by knowledge, precision, and respect for dynamics. It is no longer about the brute force of compression but the surgical application of tools to maximize the perceived loudness, punch, and tonal balance of a track before it meets the streaming normalization ceiling.
By committing to the 7 advanced secrets outlined here—understanding True Peak, mastering the 3-stage chain, using proper metering, and employing genre-aware techniques—you can achieve explosive loudness without the destruction of your track’s essential dynamic energy. Start today by reviewing your current limiter settings and committing to the -1.0 dBTP rule. Your masters deserve to sound as powerful and clean as possible.
Frequently Asked Questions (FAQ)
What is the ideal integrated LUFS target for Competitive Mastering in 2025?
While streaming services normalize around -14 LUFS Integrated, the ideal delivery loudness for Competitive Mastering is typically between -10 LUFS and -12 LUFS Integrated. This range ensures your track has excellent perceived loudness and dynamic punch, which translates better after the normalization algorithm reduces the volume.
What does True Peak Limiting mean, and why is -1.0 dBTP important?
True Peak Limiting accounts for Inter-Sample Peaks (ISPs), which are unmeasured peaks that occur when a digital signal is converted to analog. Setting the output ceiling to -1.0 dB True Peak (dBTP) prevents these ISPs from causing audible clipping or distortion on the listener’s system, a critical step for a professional master.
Can I master a track that was mixed too loud (peaking at 0 dBFS)?
It is strongly recommended to ask for a new mix with at least 3dB to 6dB of headroom. Mastering a clip-ping mix is nearly impossible to do competitively without introducing obvious distortion, as there is no dynamic range left for the mastering tools to work with.
How often should I use multi-band compression in my mastering chain?
Multi-band compression should be used surgically and sparingly. It should be applied only to correct frequency imbalances that could not be fixed in the mix or to gently manage a few problematic, isolated frequency ranges. If you find yourself using heavy multi-band compression, it often means the mix needs more work.
What is the A/B/X referencing method?
The A/B/X referencing method is a scientific technique used in Competitive Mastering to compare your master (A) and pre-master (B) against commercial reference tracks (X) at perfectly volume-matched levels. This process removes confirmation bias and ear fatigue, ensuring objective sonic evaluation.
What is the most common mistake producers make with the low-end during mastering?
The most common mistake is neglecting the low-end’s mono compatibility, leading to phase cancellation. To fix this, use Mid-Side EQ to ensure all frequencies below 100Hz are mono, which tightens the bass and kick, making the track sound much more powerful and consistent across all systems.
Where can I find a guide on Afrobeat drum kits and essential packs to inform my mastering decisions?
You can find resources such as a guide to Afrobeat drum kits and essential packs on our blog. Understanding the unique characteristics of Afrobeat sounds, particularly the transient response and frequency envelope of the drums, is key to preserving the genre’s distinct rhythmic feel during the Competitive Mastering stage.