
Build your DIY Vocal Booth for under $100! Discover 7 simple, ultimate steps and the cheapest materials to soundproof your home recording studio instantly. Start recording clear vocals today!
Introduction (DIY Vocal Booth)
Every home producer faces the same, frustrating problem: capturing a vocal that sounds professional. When recording in an untreated room, every flutter echo, reflection, and piece of outside noise is captured by the microphone. The resulting audio sounds distant, boxy, and amateur, no matter how good your microphone is. Trying to fix this with EQ and compression later is a battle you will lose.
The Hook: A truly professional-grade DIY Vocal Booth is an investment that requires more ingenuity than money. You do not need to spend thousands on pre-fabricated solutions.
The Value Proposition: This guide provides the 7 Simple, Ultimate Steps to construct a highly effective, sound-isolating DIY Vocal Booth for under $100. By focusing on mass, absorption, and simple structural principles, you will create a professional Vocal Recording Environment that dramatically elevates your final mix quality.
H2: DIY Vocal Booth Home Studio $100 Blueprint: Materials and Budget
True soundproofing (blocking sound transfer) is expensive, but for a vocal booth, effective sound isolation and absorption are achievable on a budget. This section details the minimal investment required.
The Essential Material List (DIY Vocal Booth)
| Component | Budget Material | Estimated Cost |
| Frame | Lightweight PVC Piping & Connectors | $20 – $35 |
| Isolation/Absorption | Heavy Moving Blankets (3-4 pieces) | $30 – $40 |
| Sealing Gaps | Weather Stripping / Duct Tape | $5 – $10 |
| Fasteners | Zip Ties / Clips / Hooks | $5 – $10 |
| TOTAL | **$60 – $95** |
Material Cost Breakdown and Sourcing
The key to keeping the cost down is sourcing generic, high-mass materials. Moving blankets are thick, dense, and readily available at hardware stores or online, offering far better isolation than lightweight acoustic foam. Look for blankets labeled “heavy duty” or “industrial.”
Acoustic Panel Materials: Why Mass and Density Matter
Sound is energy. To stop it (isolation), you need mass (heavy materials) and to kill echoes (absorption), you need soft, porous materials. For a successful DIY Vocal Booth Home Studio $100 project, the moving blankets serve both purposes. Mass-Loaded Vinyl (MLV) is ideal for isolation but costly; heavy blankets are the best budget substitute.

H2: Step 1: Choosing the Perfect Cheap Isolation Booth Location
The booth is only as good as the environment it is built in. Location minimizes pre-existing acoustic flaws and external noise.
Finding the Quietest Corner (Noise Floor Analysis)
Use a simple phone decibel meter app or your DAW’s master meter to measure the noise floor in various parts of your room. Find the corner furthest from outside windows, doors, or noisy appliances. Lowering the ambient noise floor here is the single biggest factor in achieving a clean Vocal Recording Environment.
Dealing with Existing Room Modes and Reflections
Avoid placing the booth exactly in the center of the room. Corners and near walls often have fewer strong standing waves. Placing the booth at an angle can help minimize the impact of existing room modes on the booth’s internal acoustics.
Pre-Test Your Vocal Recording Environment
Before building DIY Vocal Booth, simply put the microphone where the center of the booth will be. Record 30 seconds of silence. If the noise floor is already above -60 dBFS, the location is unsuitable and will compromise the quality needed for advanced trap mixing techniques
H2: Step 2: Building the Frame and Structure
The structure must be easy to assemble, lightweight, and stable enough to support the heavy acoustic panels.
Simple PVC Pipe or Wood Frame Design
The simplest design is a four-sided cube or rectangular prism, sized just large enough for the vocalist and the mic stand (e.g., 4ft wide x 4ft deep x 7ft high). PVC is ideal due to its low cost and ease of assembly using simple T-connectors and corner pieces. Ensure the top cross-bars are rigid enough to support the weight of the blankets.
Calculating Dimensions for Optimal Vocal Clarity
Avoid making the booth square (e.g., 5ft x 5ft x 5ft), as this reinforces standing waves and boxy resonances. Uneven dimensions (e.g., 4ft x 5ft x 7ft) help disperse internal reflections, improving the sound of your Cheap Isolation Booth.
Safety and Structural Stability Checklist
DIY Vocal Booth: Always check that all PVC joints are fully seated or that wood screws are secure. The structure must be stable enough to withstand the pulling force of the acoustic panels (blankets) being hung and cinched tight.
H2: Step 3: Layering Acoustic Panel Materials for Absorption
The mass of the blankets must be used strategically to maximize both isolation and absorption.
The Blanket Method: Layering Mass Loaded Vinyl (MLV) Alternatives
Hang the heavy moving blankets over the outside of the frame, ensuring they completely overlap at the corners and seams. Use zip ties or heavy clips to cinch them tightly to the frame. The goal is to create a complete, airtight seal (as much as possible). Layering two blankets thick provides exponentially better isolation than one.
Using Rockwool or Fiberfill as Budget Absorption
If you can spare an extra $20, placing a small layer of non-itch fiberglass insulation or dense, inexpensive fiberfill (in a sealed fabric bag for safety) inside the booth can absorb more high-frequency flutter echo than blankets alone. Place this Acoustic Panel Materials on the wall directly behind the vocalist.
Sealing the Edges for Maximum Isolation
Even small gaps compromise isolation. Use duct tape or electrical tape to secure any gaps where the blankets meet the floor or the frame. Every effort made to create a sealed chamber will translate directly into a lower noise floor on your recordings.
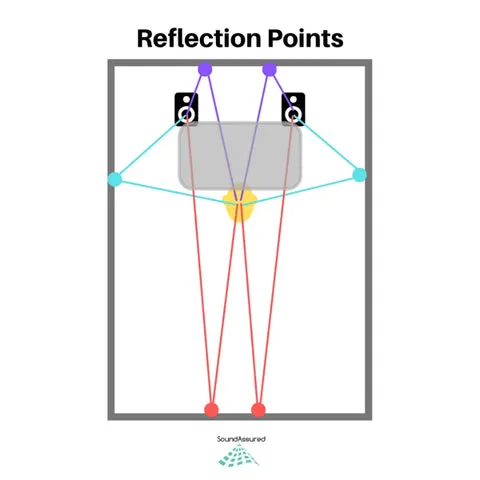
H2: Step 4: The DIY Microphone Reflection Filter
A separate, close-proximity filter is essential to prevent early reflections inside the booth from reaching the microphone capsule.
Building a Simple Panel Shield for the Mic
Use thick cardboard or lightweight wood and line the inside surface with leftover dense blanket material. This simple, curved shield sits directly behind the microphone on the stand. It acts as a miniature, close-range Microphone Reflection Filter.
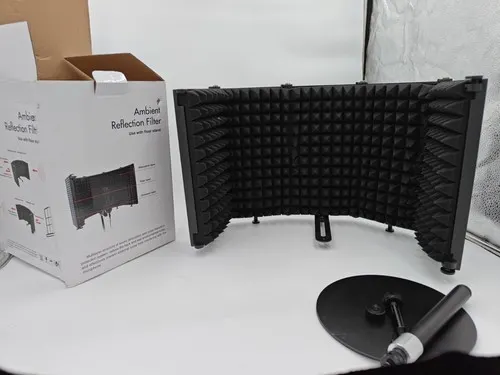
Comparing the DIY Shield to Commercial Alternatives
Commercial reflection filters are curved, dense, and often cost over $150. Your DIY shield is a simple substitute, designed to catch reflections originating from the wall immediately behind the mic, which are often the most problematic early reflections.
Placement: Positioning the Mic and Shield Correctly
Position the microphone capsule inside the filter’s curve, but not too close that the shield introduces bass-heavy proximity effect. The vocalist should sing past the filter, speaking directly into the microphone for the best quality sound in your DIY Vocal Booth.
H2: Step 5: Sealing the Door and Window Gaps
While the booth isolates the mic, the room itself needs passive isolation to keep external noise low.
Using Weather Stripping for Cheap Isolation
The biggest source of noise leakage is often the main room door and windows. Applying simple foam or rubber weather stripping around the door frame provides a cheap, temporary solution for noise isolation. This significantly helps the Soundproof Home Studio $100 goal.
The Mass Damping Compound Alternative
For permanent solutions (if budget allows), materials like Green Glue (a damping compound) placed between two layers of drywall significantly increases the door’s mass and damping capability, though this moves the project out of the sub-$100 range.
The Two-Door Approach (If Applicable)
If your recording room has two doors (e.g., one to a hallway, one to a closet), with your DIY Vocal Booth, always record in the area furthest from the main entrance, creating an airlock that naturally reduces noise transfer.
H2: Step 6: Internal Treatment and Final Testing
The final steps involve fine-tuning the internal acoustics and objectively measuring the results.
Applying Leftover Budget Acoustic Treatment
for your DIY Vocal Booth Use any leftover blanket material to cover the floor inside the booth (if your carpet isn’t thick enough) or to create hanging baffles from the ceiling of the booth. The goal is to minimize bare, reflective surfaces inside the booth itself. This ensures all reflections are short and absorbed, not bounced back into the mic.
Final Noise Floor Check and Decibel Analysis
Conduct the 30-second silent recording test again. A successful DIY Vocal Booth should deliver a noise floor reduction of at least 10-15 dB. Target a final noise floor below -60 dBFS for clear recordings.
The ‘Clap Test’ for Reverberation Time
Step inside the finished Cheap Isolation Booth and clap your hands sharply. If you hear a quick, dry “thwack” with almost no discernible reverb tail, the absorption is working correctly. If you hear a metallic ringing or sustained echo, add more internal Budget Acoustic Treatment.

H2: Step 7: Optimizing Your DIY Vocal Booth Workflow
The physical booth is ready, but the workflow needs to be adapted to the new environment.
Microphone Choice and Positioning within the Booth
Since the booth handles acoustic treatment, you can now confidently use sensitive condenser microphones without worrying about the room acoustics. Position the mic 6-10 inches from the vocalist, using a pop filter to control plosives. Record dry, clean audio for easier mixing later.
Maintaining Airflow and Ventilation
A small, sealed booth can quickly become hot and stuffy. Use a small, quiet, battery-operated fan placed outside the booth, angled to gently blow fresh air in, ensuring the fan’s sound is low enough to be filtered out in the final recording (i.e., less than 50 dB).
Lighting and Comfort for Long Sessions
The dark nature of the blankets requires dedicated internal lighting. Use a simple, low-heat LED lamp inside the booth. Ensure the vocalist is comfortable, as performance is key. A comfortable DIY Vocal Booth facilitates longer, more effective recording sessions.
Conclusion
Building a professional DIY Vocal Booth does not require a large expenditure; it requires intelligent application of acoustic principles. By following these 7 Simple, Ultimate Steps, you have leveraged cheap, accessible materials to create a high-quality, sound-isolated recording space. This foundational work ensures that the rest of your production process, from recording to mastering, is built upon a clean, professional vocal track.
Build your DIY Vocal Booth today and start recording high-quality music!
FAQ Section
Q: How much does a professional DIY Vocal Booth actually cost?
A: You can build a highly effective, small DIY Vocal Booth for under $100 using heavy moving blankets and PVC piping. Professional prefabricated booths typically start at $2,000 and go up.
Q: Will heavy blankets truly soundproof my home studio?
A: Heavy blankets provide excellent acoustic absorption and moderate isolation. They will not achieve perfect soundproofing, but they will dramatically reduce the internal reflections and lower the external noise bleed to an acceptable level for clean vocal recording.
Q: What is the difference between soundproofing and acoustic treatment?
A: Soundproofing (isolation) stops sound from entering or leaving the room. Acoustic treatment (absorption/diffusion) controls how sound behaves inside the room (killing reflections, flutter echo, and reverb). Both are necessary for a clean Vocal Recording Environment.
Q: How big should a Cheap Isolation Booth be?
A: The minimum size should allow a vocalist and mic stand to fit comfortably without touching the sides (e.g., 4ft x 4ft x 7ft). Avoid square dimensions to prevent standing waves.
Q: Can I use this guide for a soundproof drum booth?
A: No. Drum volume is exponentially louder. A drum booth requires true soundproofing (multiple layers of drywall, decoupled walls, etc.), which costs thousands of dollars, far exceeding the budget of this DIY Vocal Booth guide.
Q: What is the best material for Budget Acoustic Treatment?
A: For low-cost Budget Acoustic Treatment and isolation, heavy moving blankets are the best material due to their high mass and excellent damping properties compared to inexpensive foam.