
Trap Mixing
Trap music is one of the most dominant genres globally, yet achieving a truly professional, impactful mix remains one of the greatest challenges for producers. Why? Because the genre is defined by two contradictory demands: massive low-end weight and surgical high-end clarity.
A generic mix will make your track disappear in a sea of competition. A mix engineered with intent—where every element is hyper-processed and specifically carved—is the key to creating your unique signature sound.
This deep-dive guide is designed for producers looking to move beyond basic EQ and compression. We will break down 10 advanced Trap Mixing techniques, focusing on the crucial 808 blueprint, hi-hat transient control, and vocal processing tricks used by industry-leading engineers.
1. Introduction: The Trap Mixing & Trap Sound Philosophy
The Trap sound is characterized by its dramatic dynamics and its sparse arrangement. It’s not about complexity; it’s about impact. Before you even touch a fader, you must understand the philosophy behind the genre’s structure.
Why Sound Design Precedes Trap Mixing
In Trap, the mix starts with the source sound. A weak 808 sample cannot be “mixed” into a monster, nor can a flat hi-hat be made to sparkle without surgical processing. Before mastering Trap Mixing, prioritize sound selection. Your samples must be clean, dry, and contain the right frequencies before processing begins.
The Three Pillars of Trap: Sub-Bass, Hi-Hats, and Space
Every great Trap track relies on this powerful Trap Mixing triangle:
- Sub-Bass (The Weight): The tuned, sustained 808 that anchors the track.
- Hi-Hats (The Pace): The triplet-driven, automated high-end rhythmic energy.
- Space (The Drama): The negative space created by heavy delay, reverb, and sparse percussion.
Understanding The Three Pillars of Trap (Source: Music Production Forum/Magazine) is essential for effective mixing.
The Goal: Creating a Signature Sound
A signature sound isn’t just a unique melody; it’s a unique feel. Is your sound darker? Brighter? More distorted? Your unique approach to Trap Mixing, especially your approach to the 808 and hi-hat processing, is what will help you in creating a signature sound that defines your brand.
2. Pillar I: The Definitive 808 Blueprint (The Core of Trap Mixing)
The 808 is the bassline, the kick, and the rhythmic force all rolled into one. It is the single most critical element in any Trap mix.
Tip 1: Tuning and Pitching the 808 (Why Key is King)
The 808 must be tuned to the key of the song, but beyond that, you must manage its decay. A common pro technique is to shorten the 808’s decay slightly more than the rhythmic length of the note. This creates a subtle rhythmic tension that makes the bassline feel tighter and more controlled.
- Process: Use a tuner plugin on the 808 and ensure the fundamental frequency matches the root note of the bassline. Apply a fast, heavy compressor to the 808’s tail to aggressively control its sustain.
Tip 2: Mid/Side (M/S) Processing for Sub-Bass Width
The cardinal rule of sub-bass is that it must be mono below 120 Hz. However, you can give the 808 perceived width and texture above that point using M/S EQ.
- Process: Place an M/S EQ on your 808.
- Mid Channel: Boost the fundamental (usually 35-60 Hz) and the upper harmonics (100-200 Hz) for punch.
- Side Channel: Apply a high-pass filter (HPF) around 120 Hz to eliminate all sub-information from the side channel. You can then apply a slight, wide boost to the mid-high range (400 Hz to 2 kHz) on the Side channel to create a subtle, wide texture that makes the bass feel huge without compromising the vital mono sub-foundation.
Tip 3: The Sidechaining Bass Strategy (Kick vs. 808)
Avoid the basic sidechain ducking typically used in House music. In Trap, the kick and 808 often share frequencies, so we use precise dynamic EQ or multi-band sidechaining.
- Process: Instead of traditional volume ducking, use a multi-band compressor or dynamic EQ on the 808. Sidechain the kick drum to trigger dynamic reduction only in the shared frequency range (e.g., 60-120 Hz) of the 808. This allows the kick’s transient to punch through cleanly without totally muting the 808. This is an advanced technique compared to a basic guide to sidechain compression.
3. Pillar II: Mastering the High-End (Hi-Hats and Percussion)
The high-end defines the groove and the rhythmic complexity of Trap. It must be sharp, aggressive, and highly automated.
Tip 4: Hi-Hat Sequencing and Micro-Timing for Groove
The famous triplet-feel in Trap comes not just from 1/8T notes but from micro-timing variations that simulate a live performance (often called humanization).
- Process: Program the core hi-hat pattern, then slightly shift a few key triplets or 1/16th notes off the grid by 10-20 milliseconds (micro-timing). Next, use a MIDI velocity randomizer or manually vary the velocity of the closed hi-hats. This complex technique ensures your hi-hat sequencing has a unique, evolving groove. This is essential for a guide on hi-hat sequencing and groove.
Tip 5: Transient Shaping on Hi-Hats for Crispness
If your hi-hats sound thin or lack definition, they need precise transient control to cut through the heavy bass and melody.
- Process: Apply a transient shaper plugin (Source: Software/VST Vendor) to the hi-hat bus.
- Attack: Boost the attack to make the initial tick of the hat louder and sharper, giving it definition.
- Sustain: Reduce the sustain slightly to make the hat decay faster, creating more rhythmic space and preventing a wash of high-frequency noise.
Tip 6: Filtering and Reverb on Hi-Hats for Space
Trap uses heavy reverb, but it must be managed to maintain clarity.
- Process: Create a short, metallic reverb send (e.g., a plate reverb) for the hi-hats. Critically, high-pass filter the reverb send at 5 kHz and low-pass filter it at 12 kHz. This confines the reverb to a narrow, high-frequency bandwidth, giving the hats space and sizzle without washing out the core mix.
4. Pillar III: Vocals and Atmosphere (The Signature Sound Layer)
Trap vocals are defined by proximity, aggression, and extreme clarity. They must sound “in your face” despite being drenched in effects.
Tip 7: The Aggressive Parallel Compression Method for Vocals
To make the vocal sit forward and sound consistently loud without peaking, use heavy parallel compression.
- Process: Send the main dry vocal to an auxiliary bus. On this bus, apply a compressor with an extremely high ratio (10:1 or more), a fast attack, and a fast release. Crush the signal heavily. Then, blend this crushed signal with the dry signal using the send return fader until the vocal sounds uniformly thick and aggressive. This is far more effective than conventional serial compression, as detailed in parallel compression techniques.

Tip 8: Advanced Delay and Reverb Ducking for Clarity
in Trap Mixing we often uses long, exaggerated delay and reverb throws for atmosphere and flair. To prevent these effects from cluttering the mix, they must be dynamically controlled.
- Process: Place a compressor on the reverb/delay return track. Use a sidechain key input from the dry lead vocal. When the dry vocal speaks, the compressor ducks the reverb/delay volume significantly. As soon as the vocal stops, the effect swells back up. This gives the illusion of huge, wet effects without sacrificing the essential dry vocal clarity.
Tip 9: Creative Use of Autotune/Melodyne (The Modern Trap Voice)
The aggressive, pitch-corrected sound is integral to the modern Trap aesthetic. It is not just a fix; it is an effect.
- Process: Use your pitch correction software (Autotune or Melodyne) aggressively, setting the Retune Speed to 0 (instant correction). For a signature sound, subtly automate the formant shifting (lowering the formant slightly for a “darker” voice or raising it for a “helium” effect) on key phrases. This is essential for achieving the modern, highly stylized vocal delivery referenced in creative use of autotune articles.
5. Mix Bus & Mastering Chain (The Final Polish)
The mix bus is where the entire track is glued together. A common mistake is using generic mastering presets; in Trap, the mix bus must enhance the low-end groove.
Tip 10: Mix Bus Compression – Glueing the Low-End
For Trap Mixing use a compressor on the master channel with a slow attack (40ms+) and a fast-to-medium release (100ms-200ms).
- Process: This setting allows the crucial transients (kicks, snares) to pass through untouched before the compressor gently “squeezes” the body of the beat (the sustained 808 and pads). The slow attack prevents the compressor from hitting the transients, maintaining the punch, while the quick release ensures the compressor is ready for the next hit, enhancing the rhythmic pump and gluing the 808 and kick together for any trap mixing.
Final Limiting and Loudness Standards in Trap Mixing
Trap is loud, but don’t sacrifice dynamics for volume. Aim for an integrated loudness of -8 to -6 LUFS. For Trap Mixing Use a clipper before the final limiter to shave off sharp transients and add loudness without the harsh distortion a limiter would create, providing a clean, aggressive sound that streams well.
6. Technical Deep Dive: Achieving Low-End Clarity in Trap Mixing
The battle for low-end clarity is where most Trap Mixing engineers fail. Your mix must be surgical.
Frequency Splitters and Multi-Band Dynamics
Use a dynamic EQ or multi-band compressor on the full drum bus. Place a narrow band reduction filter (high Q) exactly on the main sub-fundamental frequency of the 808 (e.g., 40 Hz). Set the threshold so the band only ducks when the 808 hits, preventing boominess in the mix when the 808 is playing, but leaving space when it is silent.
Mono-ing the Sub-Frequencies (The essential 120 Hz rule)
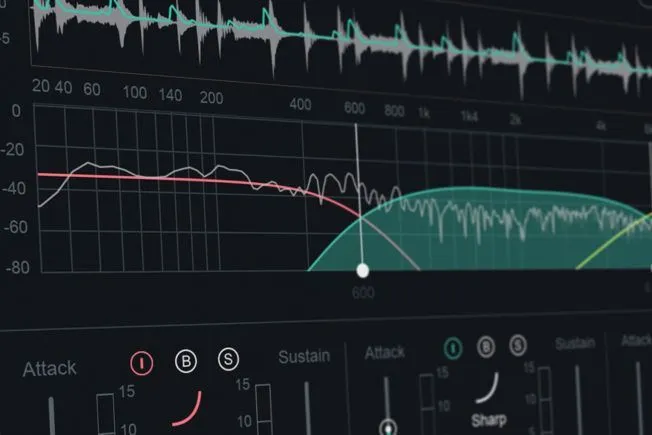
In Trap Mixing this is a non-negotiable rule: all elements below 120 Hz must be mono. Stereo information in the low frequencies causes phasing issues when summed to mono (as happens in clubs or on small devices) and results in massive power loss. Use a stereo width plugin or an M/S EQ on your master bus to ensure the sub-bass is 100% mono.$$IMAGE PLACEMENT \#5$$
Image Description: A diagram illustrating a bass frequency spectrum with a dividing line at 120 Hz, showing all frequencies below that line grouped into a single mono wave.
7. Conclusion: Mastering Trap Mixing
Mastering Trap Mixing is about developing hyper-specific habits—the 808 blueprint, the precise transient shaping, and the aggressive vocal processing. By incorporating these 10 advanced techniques, you move from being a casual producer to an engineer with intent.
Your trap mixing is the final frontier of your creativity. Forge your unique signature sound today.
8. FAQ: Trap Mixing Challenges
Q1: How low should I let my 808 go?
A: The fundamental frequency (the lowest, loudest peak) of your 808 should typically sit between 35 Hz and 60 Hz. Frequencies below 30 Hz are generally rumble and should be high-pass filtered to clean up the headroom.
Q2: What is a typical BPM range for Trap?
A: The typical range for Trap Mixing is 130 BPM to 176 BPM, however, this is usually half-time. When listening, the actual groove often feels like 65 BPM to 88 BPM.
Q3: Should I use stereo or mono kicks?
A: You should always use mono kicks. Like the 808, the kick is the rhythmic foundation and must be solid, centered, and without any phasing issues.
Q4: How do I make my vocals sound “wetter” without losing clarity?
A: Use the Advanced Delay and Reverb Ducking technique (Tip 8). Sidechain your reverb and delay returns to the dry vocal. The effects will only be prominent between words, giving the impression of a huge, wet mix without cluttering the vocal’s core clarity and presence.