
Over-Compressing Audio Dynamics
Your mix sounds flat. Lifeless. Exhausting to listen to after 30 seconds. You have been over-compressing audio dynamics, and your music is paying the price.
The loudness wars convinced an entire generation of producers that squashing every peak into a flat brick was the path to professional results. The truth? Over-compressing audio dynamics destroys the very elements that make music emotional: the quiet whispers that draw listeners in, the explosive hits that make them jump, and the natural ebb and flow that keeps heads nodding.
Here is the hard reality. Streaming platforms now normalize loudness. That means all your aggressive limiting and heavy-handed compression is not making you louder. It is just making your music sound small, distorted, and amateur.
But there is hope. In this guide, you will discover 7 proven secrets to preserve dynamics while maintaining competitive loudness. No more smashed transients. No more pumping artifacts. Just punchy, professional, emotionally engaging mixes that translate everywhere.
Why Over-Compressing Audio Dynamics Destroys Your Music
Over-Compressing Audio Dynamics: Loudness War Hangover
Between 1990 and 2015, record labels fought an arms race for perceived loudness. Every new release had to sound “hotter” than the last. Engineers smashed dynamics with brick-wall limiters, clipping converters, and cascading compressors. The result? A generation of deafening, fatiguing records with zero emotional range.
According to Audio Engineering Society research on loudness normalization , the average dynamic range of commercial pop music dropped from 12dB in 1985 to just 4dB by 2010. Then streaming platforms changed everything.
Spotify, Apple Music, and YouTube now apply loudness normalization. Your -6 LUFS master gets turned down to -14 LUFS anyway. All that crushing you did? It just introduced distortion and killed your punch for absolutely no benefit.
What Actually Happens to Your Waveform
When you over-compress audio dynamics, here is what happens at the sample level:
First, your attack stage grabs transients before they naturally bloom. A snare hit that should spike to -3dB peak gets clamped to -8dB. The crack becomes a thud. The impact vanishes.
Second, your release stage pumps the background upward after every loud sound. Listen for that breathing effect where hi-hats swell unnaturally after a kick drum. That is over-compression artifacts.
Third, your threshold becomes so low that even quiet passages trigger gain reduction. A whispered vocal should sit at -20dB RMS. After over-compressing, it sits at -10dB right next to your screamed chorus. No contrast. No emotion.
5 Telltale Signs You Are Over-Compressing Audio Dynamics
Check your mixes for these symptoms:
1. Loss of punch – Your kicks and snares feel flat and cardboard-like instead of impactful.
2. Audible pumping – Background elements swell up after transient sounds, creating a breathing or “sucking” sound.
3. Flat waveforms – Your master track looks like a brick instead of a mountain range with peaks and valleys.
4. Listener fatigue – People cannot listen to your track for more than 60 seconds without feeling tired or annoyed.
5. Distorted transients – Your drums sound fuzzy or clipped on the initial attack, especially after mastering.
If you recognized any of these signs, keep reading. The fix is simpler than you think.
Understanding Dynamic Range Before You Fix Compression
What Is Dynamic Range (And Why It Matters)
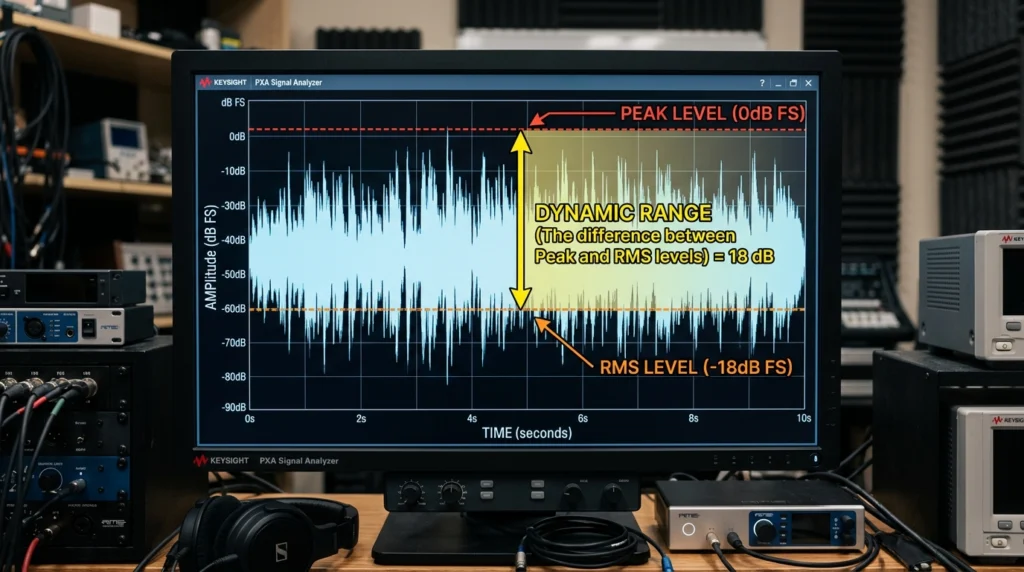
Dynamic range is the difference between the loudest and quietest parts of your audio signal. Measured in decibels (dB), a healthy mix might have 12-20dB of dynamic range. A crushed, over-compressed mess might have 3-6dB.
Music needs dynamic range for the same reason films need lighting contrast. Imagine watching a horror movie where every scene is equally bright. No shadows. No darkness. No tension. Boring, right?
The same applies to audio. A verse sits quieter to draw listeners in. A pre-chorus builds energy. A chorus explodes with impact. That contrast requires preserved dynamics. When you stop over-compressing audio dynamics, you restore this emotional architecture.
For a deeper understanding of how dynamics function within music theory, check this foundational music theory guide for producers.
Over-Compressing Audio Dynamics: Crushing Your Peaks
Many producers believe limiting peaks is “safe.” The logic seems sound: if no sample exceeds 0dB, your track cannot clip. But aggressive peak limiting has hidden costs:
Transient distortion – Limiters with 10ms attack times let the initial transient through BEFORE clamping down. This creates a “pop” then “squash” effect that sounds unnatural.
Phase shift – Heavy limiting introduces frequency-dependent phase shifts that smear your stereo image and transient clarity.
Lost micro-dynamics – The tiny volume variations within a held guitar chord or sustained vocal note disappear, leaving a static, lifeless tone.
Over-Compressing Audio Dynamics: LUFS vs True Peak
To fix over-compressing, you need proper measurement tools. Here are the key metrics:
LUFS (Loudness Units Full Scale) – Measures perceived loudness over time. Streaming targets: -14 LUFS integrated for Spotify, -16 LUFS for Apple Music.
True Peak – Measures inter-sample peaks that can cause distortion after conversion. Aim for -1dB True Peak maximum for clean streaming masters.
Dynamic Range (DR) – A score from 1 to 20 measuring peak-to-RMS ratio. Pop music: DR6-8. Jazz: DR12-14. Classical: DR15-20.
For an in-depth technical explanation, iZotope’s LUFS and dynamic range measuring guide offers excellent visual examples.
7 Secrets to Preserve Dynamics While Staying Competitive
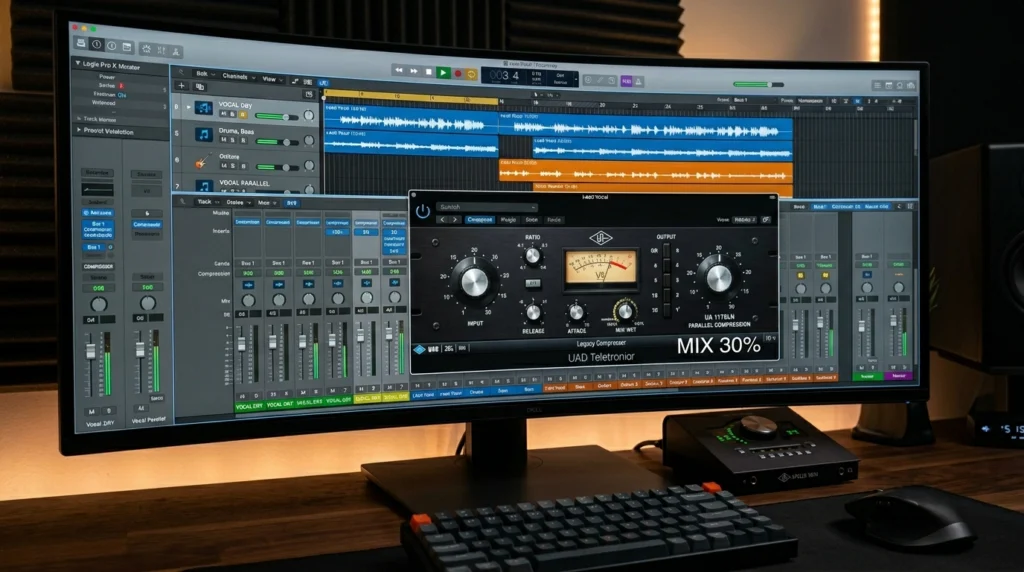
Secret 1: Parallel Compression for Punch Without Squash
Parallel compression (also called New York compression) is your secret weapon to stop over-compressing audio dynamics while maintaining punch.
Here is how it works:
Create an auxiliary send from your drum bus. Insert a compressor smashed to extreme settings: ratio 8:1, threshold -30dB, attack 1ms, release 50ms. The parallel channel sounds distorted and flattened on its own. Now blend this crushed signal with your original, untouched drums at 20-30% mix.
The result? You keep the natural transients and dynamic range from the dry signal while adding sustain and density from the compressed signal. Punch preserved. Dynamics intact. Loudness achieved.
Pro tip: Use this technique on your entire mix bus at 15-25% blend for glue without over-compressing audio dynamics.
Secret 2: Multi-Band Dynamics Control
Standard broadband compressors cannot distinguish between frequency ranges. A loud kick drum triggers gain reduction that also squashes your hi-hats and vocals. That is how you ruin dynamics across your entire mix.
Multi-band compression solves this. Split the frequency spectrum into 3-5 bands:
Low band (20-150Hz) – Heavy compression (4:1 ratio, 10ms attack) tightens bass without affecting mids.
Low-mid band (150-800Hz) – Moderate compression (3:1 ratio) controls boxiness.
Mid band (800Hz-4kHz) – Gentle compression (2:1 ratio, slow attack) preserves vocal dynamics.
High band (4kHz+) – Light compression (2:1 ratio) smooths harshness while retaining air.
Your high-mids and highs retain their dynamic sparkle while your lows stay controlled. This targeted approach naturally prevents over-compressing audio dynamics in critical frequency ranges.
Secret 3: Attack and Release Sweet Spots
The biggest cause of over-compressed dynamics is incorrect attack and release timing. Here are the sweet spots:
Slow attack (30-50ms) – Preserves transient punch. Ideal for drums, percussion, and plucked instruments. The initial hit passes through uncompressed, then compression catches the sustain.
Fast attack (0.1-5ms) – Controls peaks but dulls transients. Use sparingly on vocals and bass where you want smooth sustain over punch.
Release timing formula – Set release so gain reduction returns to 0dB exactly before the next transient. For 120 BPM music, try 100-150ms release. For 80 BPM, try 200-300ms. For 140 BPM, try 60-80ms.
For advanced sidechain compression techniques that rely on precise attack and release settings, check this advanced sidechain compression guide.
Secret 4: Clip Instead of Limit
Hard clipping is your alternative to aggressive limiting. A clipper instantly cuts off waveform peaks above a threshold. Unlike a limiter (which uses gain reduction with release timing), clipping creates no pumping or breathing artifacts.
Why clippers preserve dynamics: Clipping only affects peaks exceeding your threshold. All other dynamics remain untouched. The clipped peaks become distortion, but brief (under 1ms) clipping is often inaudible.
Practical application: Insert a clipper on your drum bus set to -3dB threshold. Your snare peaks get shaved by 1-2dB. The punch remains because attack time is zero. No pumping. No release tails. Just controlled peaks.
For an in-depth community discussion, professional mastering engineers discuss clipping versus limiting on Gearspace.
Secret 5: Volume Automation Before Compression
Here is the secret that separates amateurs from pros: automation before compression.
Over-compressing audio dynamics almost always happens because you are asking a compressor to fix volume problems it should never handle.
Over-Compressing Audio Dynamics, The workflow:
- Listen for uneven vocal phrases or instrument sections
- Draw volume automation to level these before any compression
- Apply gentle compression (2:1 ratio, 3-6dB reduction max) for glue only
When you automate first, your compressor works consistently across the entire performance. No more slamming gain reduction on loud words while quiet words get no compression. Your dynamics remain natural because you handled leveling manually.
Secret 6: The 3dB Rule for Gain Reduction
Most over-compression happens from excessive gain reduction. Watch your meter. Are you seeing 8dB, 10dB, or 12dB of reduction? That is destruction, not processing.
The 3dB rule: Never exceed 3-4dB of gain reduction on any single compressor. If you need more control, use multiple compressors in series (more on that in Secret 7).
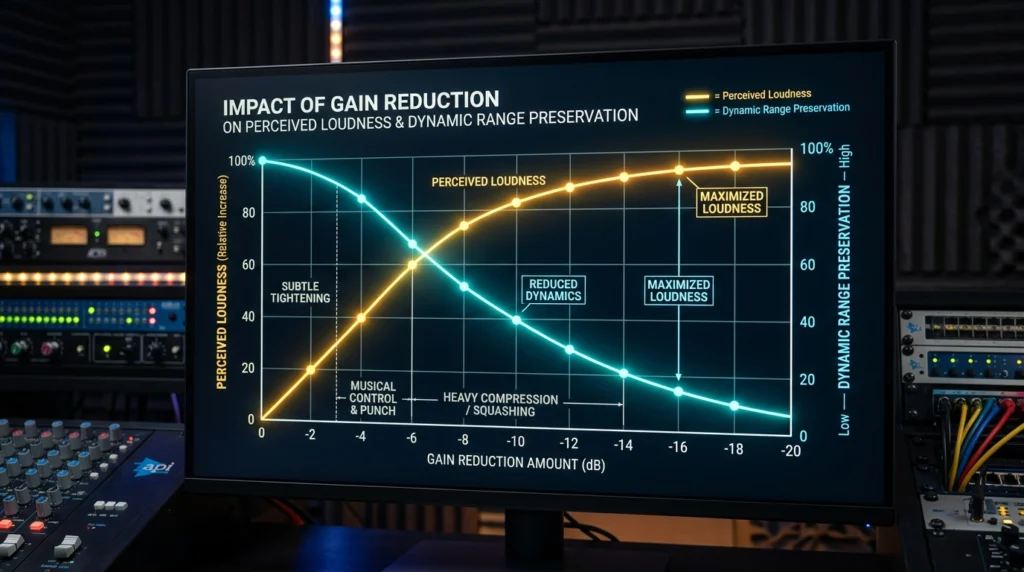
Why 3dB works: Every 3dB of reduction impacts dynamic range by approximately 2dB. Four compressors doing 3dB each gives you 12dB of total control while preserving more dynamics than one compressor doing 12dB. The cumulative result is transparent.
Try this test. Apply three compressors in series: each at 2:1 ratio, 3dB reduction, different attack/release settings. Compare to one compressor at 8:1 ratio, 12dB reduction. The serial approach sounds more natural every time.
Secret 7: Reference Tracks with Healthy Dynamics
You cannot fix what you cannot hear. Ear fatigue and over-familiarity with your own mix blind you to compression problems.
The reference process:
- Import 3 professional tracks in your genre
- Analyze their dynamic range with a meter (YouLean Loudness Meter recommended)
- Loop your mix and a reference, matching perceived loudness
- A/B switch every 30 seconds
- Note where your mix lacks punch or sounds overly dense
A professional comprehensive dynamic range explanation from Sound on Sound provides additional context on what to listen for.
For trap producers specifically, analyzing how to make trap beats like Drake reveals how his engineers preserve punch while staying competitive.
Advanced Techniques to Avoid Over-Compressing Audio Dynamics
Over-Compressing Audio Dynamics: Less Is More
Serial compression means chaining multiple compressors with gentle settings instead of one aggressive unit.
Typical serial chain:
- Compressor 1 (fast opto-style): 2:1 ratio, 10ms attack, 50ms release, 2dB reduction – controls peaks
- Compressor 2 (VCA-style): 2:1 ratio, 30ms attack, 150ms release, 2dB reduction – adds density
- Compressor 3 (FET-style): 1.5:1 ratio, 1ms attack, 200ms release, 1dB reduction – glues the mix
Each compressor does minimal work. Together, they provide transparent control without audible over-compressing audio dynamics.
Over-Compressing Audio Dynamics: Sidechain Compression
Sidechain compression gets a bad reputation because producers overuse it for EDM pumping effects. Used subtly, sidechain prevents masking without audible compression.
Musical sidechain settings:
- Trigger: Kick drum (pre-fader send)
- Attack: 10ms (lets transient through)
- Release: Match to song tempo (100-150ms for 120 BPM)
- Ratio: 3:1
- Gain reduction: 2-3dB maximum
Your bass ducks imperceptibly under each kick. Your kick retains impact. Your dynamics remain intact because the compressor only activates on kick hits.
Upward Compression: The Overlooked Gem
Most compressors reduce loud sounds (downward compression). Upward compression does the opposite: it raises quiet sounds.
When to use upward compression:
- Quiet vocal phrases that get lost
- Fading reverb tails you want to extend
- Room ambience you want to emphasize
The Waves MV2 and FabFilter Pro-MB offer upward compression modes. Apply 2-4dB of upward gain to quiet passages. Your loud dynamics stay untouched. Your quiet sections become audible. Dynamic range actually increases while perceived consistency improves.
Genre-Specific Dynamic Range Targets
Different genres demand different dynamics. Here are your targets to avoid over-compressing audio dynamics:
Electronic and EDM Dynamics
- Integrated LUFS: -8 to -11 LUFS
- True Peak: -1dB TP
- Dynamic Range: DR5-DR7
- Characteristics: Punchy transients, consistent bass, moderate squash acceptable
Hip-Hop and Trap Range Guidelines
- Integrated LUFS: -9 to -12 LUFS
- True Peak: -1dB TP
- Dynamic Range: DR6-DR8
- Characteristics: Loud kick transients, breathing verses, explosive choruses
For hip-hop specific advanced mixing techniques, avoid over-compressing your 808s which need extended dynamic range for proper sustain and decay.
Rock and Pop Dynamics Standards
- Integrated LUFS: -10 to -13 LUFS
- True Peak: -1dB TP
- Dynamic Range: DR7-DR9
- Characteristics: Natural drum dynamics, loud choruses, quieter verses
Orchestral and Jazz Wide Dynamics
- Integrated LUFS: -16 to -20 LUFS
- True Peak: -3dB TP (reserve headroom)
- Dynamic Range: DR12-DR18
- Characteristics: Extreme dynamic shifts, natural transient preservation, minimal compression
For accurate streaming loudness data, streaming platform loudness targets and dynamic range research provides platform-specific requirements.
Tools That Prevent Over-Compressing Your Masters
5 Best Metering Plugins for Dynamic Range
You cannot fix what you cannot measure. These tools make over-compressing audio dynamics impossible to ignore:
1. YouLean Loudness Meter (Free/Pro) – The industry standard for LUFS, True Peak, and Dynamic Range measurement. The free version covers 90% of needs.
2. iZotope Insight 2 – Comprehensive metering suite with dynamic range histogram showing exactly where your dynamics are collapsing.
3. Waves WLM Plus – Streaming presets for every platform with real-time loudness tracking.
4. TC Electronic Clarity M (Hardware/Plugin) – Legendary broadcast meters now in plugin form with stunning visual feedback.
5. Nugen VisLM – The most accurate ITU-R BS.1770 metering with detailed logging.
You can download YouLean Loudness Meter free here and start measuring your dynamics immediately.
Essential Compressors with Character
Not all compressors damage dynamics equally. These models preserve punch naturally:
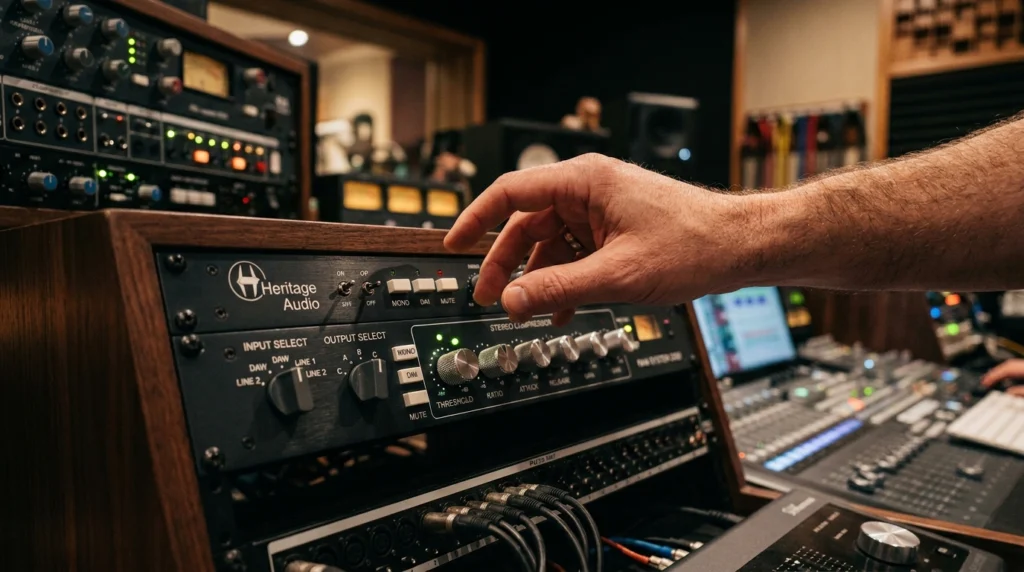
SSL G-Master Bus Compressor – The glue compressor. 2:1 ratio, 10ms attack, auto release preserves more dynamics than any plugin emulation.
API 2500 – The “thrust” filter prevents low-end from over-triggering compression, protecting your bass dynamics.
Distressor – The “British mode” with opto release curves preserves transients better than VCA designs.
1176 (FET) – Fast attack but harmonically rich distortion masks compression artifacts. Use 4:1 ratio, 12:1 for parallel.
Limiter Alternatives for Loudness
Traditional brick-wall limiters punish dynamics. Try these alternatives:
Clip-to-Limit hybrid – Clip peaks by 1-2dB first, then limit by 1-2dB. The clipper handles transients, the limiter handles average levels.
True peak limiting with lookahead – 10ms lookahead allows gentle 2:1 limiting instead of brick-wall 20:1 limiting.
Saturation for loudness – Tape or tube saturation adds harmonic energy that sounds louder at lower RMS levels. Use -18dB input into a tape plugin, the harmonics create perceived loudness without compression.
For AI-powered tools that help avoid over-compressing, AI music production tools guide shows modern solutions.
The 5-Step Workflow to Preserve Dynamics Forever
Step 1: Gain Stage Before Any Compression
Over-compressing audio dynamics starts at the input stage. If your signal hits a compressor too hot, you get compression whether you want it or not.
Proper gain staging:
- Set all channel faders to 0dB
- Adjust clip gain or input trim so peaks hit -18dB to -12dB
- Your compressor will trigger only when you set the threshold, not from hot inputs
- Your dynamic range remains intact because you control when compression engages
Step 2: Apply Subtractive EQ First
EQ before compression always. Here is why:
Cutting frequencies prevents those frequencies from triggering your compressor. A 100Hz rumble could be causing 4dB of unnecessary gain reduction. Remove that rumble with a high-pass filter at 30Hz. Suddenly your compressor works only on musical content.
The EQ-first rule: Address frequency imbalances. Then compress. Your dynamics stay natural because your compressor only responds to intentional musical elements.
Step 3: Compress in Stages, Not One Shot
One aggressive compressor ruins dynamics. Three gentle compressors preserve them.
Staged compression workflow:
- Channel compressor (2:1, 2-3dB reduction) on individual tracks
- Bus compressor (2:1, 1-2dB reduction) on drum bus, bass bus, vocal bus
- Mix bus compressor (1.5:1, 1dB reduction) only if needed
Each stage adds control without audible damage. This approach naturally stops over-compressing audio dynamics at every level of your mix.
Step 4: Use Saturation for Perceived Loudness
Here is the radical truth: compression is not the only path to loudness. Saturation creates harmonic energy that tricks ears into hearing louder signals without reducing dynamic range.
Saturation settings for loudness:
- Tape saturation (1-3% harmonic distortion) adds warmth and density
- Tube saturation adds even-order harmonics that sound musical
- Soft clipping on transient peaks adds 1-2dB of loudness with no release artifacts
Apply saturation before your final limiter. You will need 2-3dB less limiting to achieve the same perceived loudness. That means 2-3dB more dynamic range preserved.
Step 5: Master with Dynamic EQ, Not Multiband Compression
Multiband compression is overkill for most mastering applications. Dynamic EQ offers surgical control without the pumping artifacts.
Dynamic EQ vs multiband compression:
- Dynamic EQ applies gain reduction only when a threshold is exceeded
- No release pumping because it uses RMS detection
- Target specific problem frequencies (resonances, harshness)
- Everything else retains full dynamic range
Apply dynamic EQ cuts at 2-4kHz if the mix gets harsh. Cut at 100-200Hz if low-mid buildup occurs. Your overall dynamics remain untouched because only specific frequencies get controlled.
For more explosive secrets to finish your music production, this workflow integrates perfectly with dynamics preservation.
Conclusion (Over-compressing audio dynamics)
You started this article over-compressing audio dynamics, probably without even realizing it. You thought more compression meant more loudness. You thought squashing peaks was professional. You thought the loudness wars demanded sacrifice.
The truth is simpler. Streaming platforms leveled the playing field. Your aggressive limiting does nothing for loudness and everything for distortion. Your music sounds flat not because of your arrangement, your sounds, or your talent, but because you squeezed the life out of its dynamics.
The 7 secrets you learned today change everything. Parallel compression adds density without squash. Multi-band processing targets only problem frequencies. Proper attack and release timing preserves transients. Clipping replaces limiting. Automation fixes levels before compression touches audio. The 3dB rule prevents damage. Reference tracks keep you honest.
Combine these with advanced serial compression, subtle sidechaining, upward compression, genre-appropriate targets, proper metering tools, and a 5-step preservation workflow. You now have a complete system to stop over-compressing audio dynamics permanently.
Your next mix will sound different. The drums will punch. The vocals will breathe. The chorus will explode while the verse draws listeners close. That contrast, that emotional architecture, that is what dynamics deliver.
Stop being a compressor operator. Start being a dynamics preservationist. Your listeners will thank you with every head nod, every emotional tear, every replayed track.
Ready to fix your mixes? Apply the 3dB rule today. Open your most recent project, check your gain reduction meters, and dial back every compressor exceeding 4dB of reduction. Hear the difference immediately.
FAQ
What is over-compressing audio dynamics?
Over-compressing audio dynamics occurs when you apply excessive gain reduction that destroys the natural volume differences between quiet and loud passages in your music. Signs include flat waveforms, audible pumping, loss of transient punch, and listener fatigue. Streaming normalization makes over-compression pointless because platforms turn down loud masters anyway.
How much compression is too much for preserving dynamics?
The 3dB rule states you should never exceed 3-4dB of gain reduction on any single compressor. If you need more control, use multiple compressors in series (three compressors doing 3dB each sounds more natural than one compressor doing 9dB). Watch your gain reduction meters religiously.
What is the difference between limiting and over-compressing?
Limiting applies high-ratio compression (10:1 to 20:1) specifically to control peaks. Over-compressing means applying ANY compression (including low-ratio) to the point where dynamic range collapses. You can limit transparently with 1-2dB of peak reduction. You over-compress when you exceed 4-6dB of reduction on any processor.
Can I achieve commercial loudness without over-compressing?
Absolutely. Use the 5-step workflow: gain stage properly, EQ before compression, compress in stages, use saturation for perceived loudness, and master with dynamic EQ. Professional masters at -9 LUFS can have DR8 dynamic range while smashed masters at -6 LUFS have DR4 and sound worse.
Which genres require the most dynamic range preservation?
Orchestral and jazz require the most dynamic range (DR12-DR18) with extreme quiet-to-loud contrasts. Acoustic folk, classical guitar, and audiophile recordings also demand wide dynamics. EDM and modern pop can tolerate less dynamic range (DR5-DR9) but still need punch preservation.
What tools measure if I am over-compressing?
YouLean Loudness Meter (free) shows Dynamic Range (DR) score and loudness range. iZotope Insight 2 displays dynamic range histograms. Your eyes also help: if your waveform looks like a brick with no visible peaks and valleys, you are over-compressing.
How does streaming normalization affect my compression choices?
Streaming platforms (Spotify, Apple Music, YouTube) all apply loudness normalization. Spotify targets -14 LUFS integrated. If your master is -6 LUFS, Spotify turns it down by 8dB. All your aggressive limiting did was add distortion that becomes audible when turned down. Master to -10 to -12 LUFS with healthy dynamics instead.
Can over-compressing cause permanent hearing damage?
Indirectly yes. Over-compressed music causes listener fatigue faster because the ear receives no dynamic contrast to rest. Constant loudness forces your middle ear muscles to stay contracted. While not permanent damage, it makes people stop listening to your music sooner. Preserving dynamics keeps listeners engaged longer.