
Texture layering is the difference between a track that sounds flat and forgettable and one that pulls the listener deeper with every replay. It is the technique that makes professional productions feel alive, three-dimensional, and rich, even when the arrangement is minimal.
Most producers focus on the obvious elements: the melody, the drums, the vocals. What separates elite producers is what sits between and beneath those elements. The subtle pad that fills the frequency space. The tape hiss that adds warmth. The ghost percussion that suggests movement without demanding attention. These are texture layers, and they are the hidden architecture of every production you have ever loved.
This guide breaks down 7 proven secrets behind texture layering, from foundational principles to advanced techniques used by professional producers across trap, Afrobeat, amapiano, R&B, and electronic music. Every section is practical and immediately applicable.
The best productions do not sound layered. They sound inevitable. That is the goal of expert texture layering.
What Is Texture Layering and Why Do Pro Producers Rely on It
Texture layering is the practice of combining multiple sound sources, each occupying a specific role in the frequency and spatial spectrum, to create a composite sonic environment that is richer than any single element could produce alone.
The term texture in music refers to the quality and density of the sonic fabric. A sparse texture has few elements with space between them. A dense texture has many elements woven together. Neither is inherently better. What matters is whether the texture serves the emotional intent of the track.
Expert producers use texture layering not to add more sounds but to add more meaning. Every layer should answer a question: does this make the track feel more like what it is supposed to feel like?
The Difference Between Layering and Stacking
Many producers confuse texture layering with sound stacking. Stacking is adding more of the same thing, more drums, more synths, more bass. Layering is adding different things that serve different psychological functions. A stacked mix sounds crowded. A layered mix sounds full.
The distinction is critical. Texture layering requires intention about what each layer contributes to the overall experience. Without that intention, layering becomes cluttering.
Why Texture Makes Listeners Stay
Research in music psychology consistently finds that sonic complexity, within a range that remains comprehensible, increases listener engagement and replay rate. Layers that reveal themselves over multiple listens create what producers call depth: the quality of a mix that rewards attention.
Texture layering is how you give listeners something to discover on the fifth, tenth, and twentieth play. It is the production equivalent of subtext in writing.
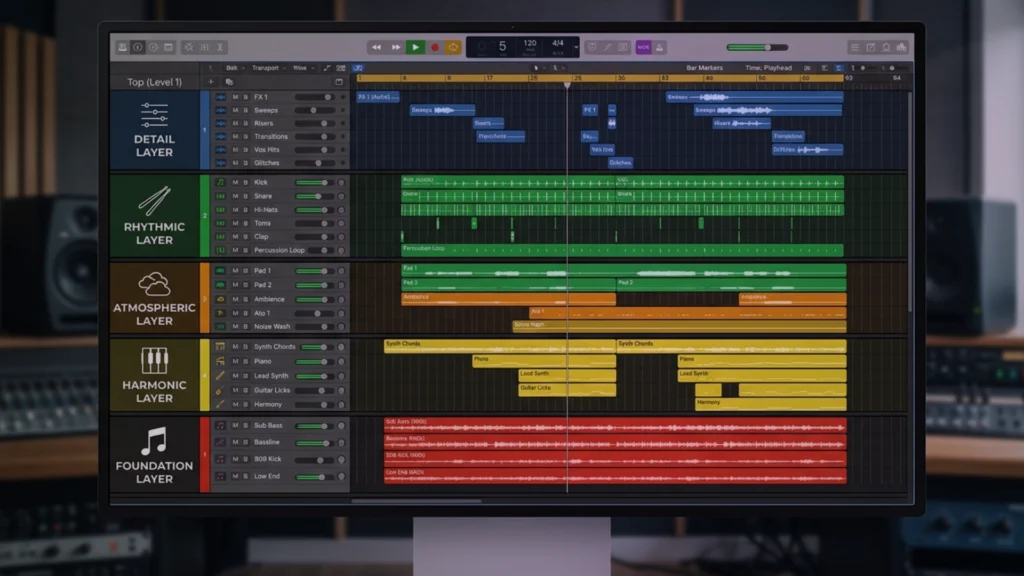
The Six Layer Categories Every Producer Should Know
Professional texture layering typically works across six distinct categories, each serving a different function in the overall sonic environment.
- Foundation layers: bass, kick, and root harmonic content
- Harmonic layers: pads, chords, and sustained tonal elements
- Melodic layers: lead elements and counter-melodies
- Rhythmic layers: percussion, hi-hats, and rhythmic texture elements
- Atmospheric layers: ambient sounds, noise, reverb tails, and spatial elements
- Detail layers: foley, one-shots, micro-samples, and ear candy
Understanding which category each sound in your session belongs to is the first step toward intentional texture layering.
Texture Layering Secret 1: Build Your Foundation Before Adding Anything Else
Every professional production starts with a solid foundation layer before any texture is added. This is the most consistently broken rule in amateur production and the most consistently followed rule in professional production.
The foundation is not just the kick and bass. It is the combination of low-frequency energy, rhythmic anchor, and root harmonic information that defines the physical and emotional center of the track. Without a solid foundation, every texture layer you add will sound uncertain because it has nothing to rest on.
Defining the Low-End Foundation
The low-end foundation consists of sub-bass content, kick drum energy, and any bass line or 808 that provides the harmonic root. These elements should be the first thing you commit to. Their frequency relationships, their timing relative to each other, and their combined dynamic behavior define the ceiling and floor for everything that comes above them.
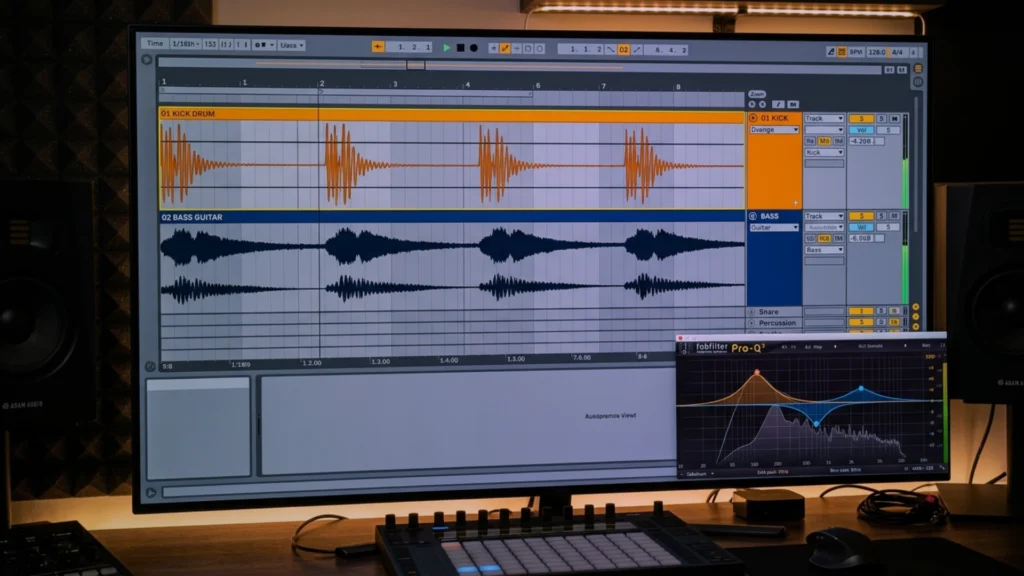
How the Foundation Dictates Texture Choices
Once your foundation is locked, it tells you what textures belong in the track. A heavy, slow-decaying 808 foundation calls for sparse, breathable textures in the mid-range. A tight, punchy kick-bass combination creates space for denser harmonic layering above it. A foundation with strong mid-bass content warns you against adding busy textures in the same zone.
The guide to making your beats sound more professional covers foundational mix decisions that directly determine how much texture your production can carry without becoming muddy.
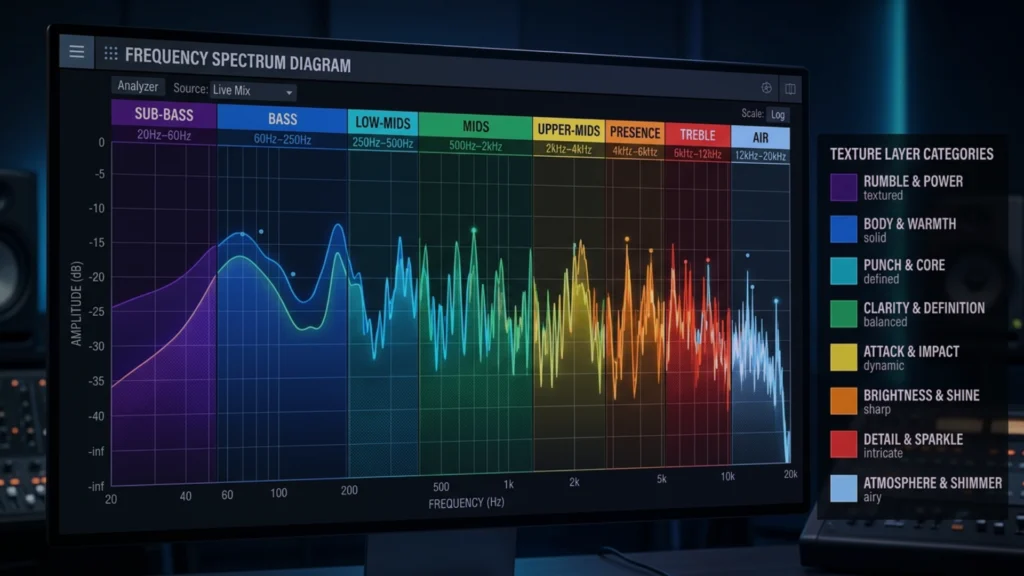
Frequency Mapping Before Layering
Before adding a single texture layer, map your foundation across the frequency spectrum. Identify which zones are occupied, which are empty, and which are contested. This map becomes your guide for where textures can live without competing with the elements that define the track.
A simple frequency map takes five minutes in any spectrum analyzer plugin and prevents hours of mix problems caused by layers that fight each other for space.
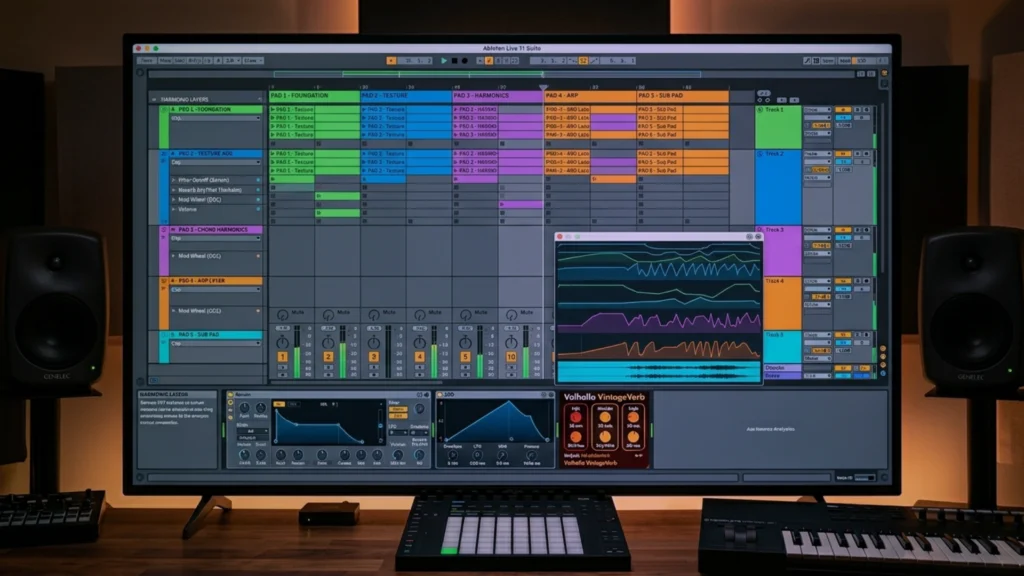
Texture Layering Secret 2: Master Harmonic Layers for Depth and Warmth
Harmonic texture layers are the pads, sustained chords, and tonal drones that fill the space between the rhythm and the melody. They are the layer that most directly determines whether a track feels warm and full or thin and hollow. Most producers either ignore them entirely or use them without intention, leaving one of the most powerful texture tools underused.
Pad Design as a Texture Tool
A well-designed pad layer does not draw attention to itself. It creates a harmonic environment that makes every other element sound better. The melody floats more naturally. The vocals sit more comfortably. The overall track feels more cohesive.
The most effective pad textures for layering share a few characteristics. They have slow attack times that allow the rhythmic elements to dominate the transient space. They have filtered high-frequency content that keeps them warm without competing with lead elements. And they have subtle movement, whether through LFO modulation, chorus, or gentle automation, that prevents them from feeling static.
Using Inversions and Voicings for Textural Richness
The specific voicing of chords within your harmonic texture layers has a dramatic effect on how dense or open the texture feels. Close voicings, where notes are stacked tightly together, create thick, dense harmonics. Open voicings, where notes are spread across a wider range, create space and airiness.
Expert producers often use multiple harmonic layers with different voicings in different octave ranges to create a sense of harmonic depth that no single chord could produce. The music theory guide for producers covers voicing and inversion techniques that directly apply to building richer texture layers.
Harmonic Tension as a Texture Signal
Dissonant harmonic layers create tension that draws listeners forward. Consonant harmonic layers create resolution and rest. Expert texture layering uses this tension and resolution cycle deliberately to create emotional movement through a track without changing the arrangement significantly.
A common technique is to introduce slightly dissonant harmonic texture during verses and resolve it in the chorus by shifting the layer to a consonant voicing of the same root chord. The listener feels the resolution without consciously identifying its source.
Texture Layering Secret 3: Atmospheric Layers Create the World Around Your Music
Atmospheric texture layers are the sounds that do not play notes and do not hit beats. They are the sonic environment: the room, the space, the world the track exists inside. These layers are the single most underused technique in independent music production and the most consistently present element in professional recordings.
Field Recordings and Foley as Atmosphere
Field recordings, real-world captured sounds such as rain, traffic, crowds, nature, and room tone, add a layer of physical reality to a production that synthesized sounds alone cannot create. A subtle street ambience under a lofi hip-hop beat makes the track feel like it exists somewhere. A distant crowd noise under a festival-ready dance track primes the listener’s body for a live experience.
This technique is not limited to any specific genre. Afrobeat productions frequently feature outdoor ambience and organic room sound. Trap productions use subtle noise textures and filtered atmospheric samples to create claustrophobic or expansive spatial impressions.
Noise as a Creative Texture Tool
Analog noise, vinyl crackle, tape hiss, and digitally generated noise textures are legitimate tools in professional texture layering. They serve two functions simultaneously. First, they add warmth and organic imperfection to digital productions. Second, they fill the perceptual gaps between elements with a continuous sonic presence that makes the mix feel unified.
The analog warmth plugins guide for 2025 covers every major plugin tool for adding organic texture and noise character to in-the-box productions, which is directly relevant to building atmospheric layers.
Reverb Tails as Atmospheric Architecture
Long reverb tails on individual elements create a secondary atmospheric layer that most listeners hear as space rather than reverb. Sending several elements in a mix to a shared reverb with a decay time of 3 to 5 seconds creates a continuous ambient cloud that glues the mix together and adds perceived depth.
This reverb layer is different from the utility reverb on individual elements. It is a texture layer in its own right, designed to create spatial impression rather than natural room simulation.
Texture Layering Secret 4: Rhythmic Texture Layers Add Life Without Adding Clutter
Rhythmic texture layers are the percussion, hi-hat patterns, and rhythmic noise elements that exist below the main drum pattern. They do not compete with the primary rhythm. They support it, thicken it, and make it feel more alive.
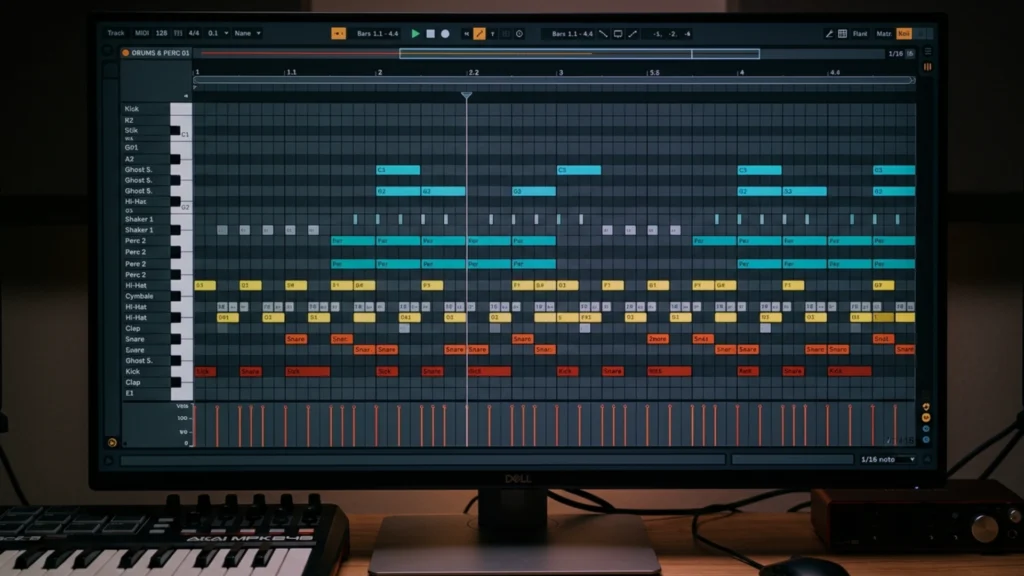
Ghost Notes and Sub-Rhythms
Ghost notes are low-velocity drum hits, typically on the snare, that suggest rhythmic movement without asserting it. Professional drummers use ghost notes instinctively. Electronic producers can replicate this effect by programming low-velocity duplicate hits around the main snare position.
Ghost notes create a sense that the rhythm is breathing rather than being programmed. They add micro-movement that keeps listeners engaged without consciously drawing their attention.
Layered Hi-Hat Textures
A single hi-hat pattern is a rhythmic statement. Multiple hi-hat layers at different velocities, tunings, and timing variations create a rhythmic texture that feels human and dynamic. The technique involves stacking two or three hi-hat sounds, each with slightly different timing offsets and velocity automation, to create a composite hi-hat texture that is fuller than any individual pattern.
This approach is central to the feel of modern Afrobeat, amapiano, and contemporary R&B production. The afrobeat drum patterns explained resource demonstrates exactly how multi-layer percussion and hi-hat textures define the rhythmic character of the genre.
Percussive Noise and Texture Hits
Beyond melodic percussion, rhythmic texture layers often include non-pitched sound design elements: white noise sweeps timed to the bar, filtered transients that suggest percussion without being identifiable, and rhythmic automation of atmospheric elements. These elements add rhythmic complexity without adding identifiable instruments that could clutter the arrangement.
Texture Layering Secret 5: The Detail Layer Is Where Pro Productions Separate From Amateur Ones
The detail layer is the category of texture layering that most producers discover last and then can never stop using. It consists of small, specific, often barely audible elements that add character, surprise, and human quality to a production.
Ear Candy and Micro-Samples
Ear candy refers to brief, unexpected sonic events: a vinyl scratch on beat three, a pitched bell hit that answers a melodic phrase, a reversed element that appears once in the bridge. These elements are not structural. They are emotional punctuation. They reward focused listening and give frequent listeners something to look forward to.
Professional productions in every genre are full of ear candy that most listeners never consciously identify but would notice immediately if removed.
Vocal Chops and Texture Samples as Detail Elements
Short vocal chops, heavily processed beyond recognition as speech, are one of the most widely used detail layer textures in modern production. A one-syllable vocal sample processed with extreme pitch-shifting, heavy reverb, and filtered high-frequency content becomes a melodic texture element that adds a human quality without competing with the lead vocal.
Building a signature approach to detail layering is one of the fastest paths to a distinctive sound identity. The guide to creating signature sounds explores how consistent detail layer choices build a recognizable production identity across your catalog.
Automation as a Detail Layer Tool
Automation of subtle parameters, filter cutoff on a pad layer, reverb wet/dry ratio on a texture element, the slow pan of an atmospheric sound, creates movement that functions as a detail layer without adding any new sounds. This approach is one of the most powerful and most underused tools in texture layering because it generates complexity from existing elements rather than requiring new ones.
Texture Layering Secret 6: Frequency Separation Is What Makes Layering Work
Every technique described so far fails without proper frequency separation between layers. This is the technical foundation of texture layering, and it is where most producers who understand layering conceptually still make consistent mistakes.
The One-Job Rule for Frequency Zones
Every layer should own one frequency zone and stay out of others. The sub-bass layer owns below 80 Hz. The foundation mid-bass layer owns 80 Hz to 200 Hz. Harmonic pad layers sit in the 200 Hz to 2 kHz range. Atmospheric layers occupy the upper-mid and air frequencies. When two layers compete for the same zone, both become less effective.
Enforcing the one-job rule requires aggressive EQ decisions. Low-cutting every element that does not need low-frequency content is not an optional finishing step. It is a foundational texture layering discipline.
The complete frequency-focused mixing guide covers the specific EQ decisions that keep layered elements separated and clear across the full frequency spectrum.
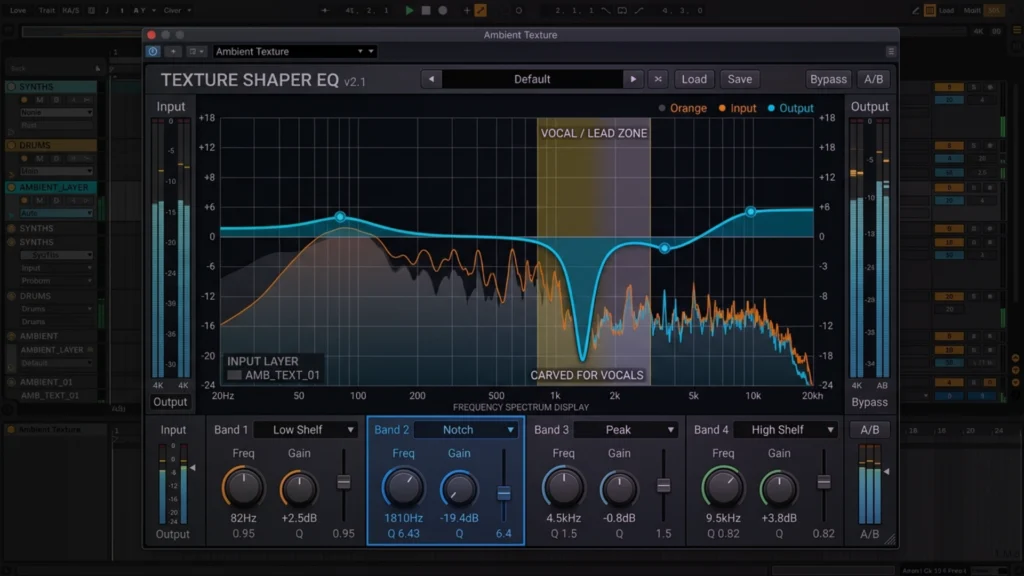
High-Pass Filtering as a Texture Tool
High-pass filtering is the most important technical tool in texture layering. Every harmonic layer, atmospheric layer, rhythmic texture, and detail element should be high-pass filtered at the point where it begins to contribute useful frequency content. Nothing below that point should survive into the mix.
A common benchmark is to high-pass every non-bass element at a minimum of 100 Hz, with most texture elements filtered significantly higher. Pads can often be high-passed at 200 Hz to 300 Hz without losing their warmth, which clears enormous amounts of low-mid space for the foundation elements.
Mid-Side Processing for Stereo Texture Control
Mid-side EQ and compression allow independent processing of the mono center and stereo sides of a mix. Expert producers use this approach to keep texture layers wide and atmospheric in the stereo field while ensuring the foundational elements remain focused and powerful in mono.
Applying a high-pass filter to the side channel only removes low-frequency stereo content from texture layers without affecting their stereo width in the upper frequencies. This keeps the low end tight and mono while allowing harmonic and atmospheric textures to spread naturally across the full stereo field.
Texture Layering Secret 7: Movement and Evolution Keep Textures Alive
Static textures are the most common mistake in texture layering. A pad that does not move, an atmospheric layer that does not evolve, a harmonic texture that plays the same voicing for four bars in a row, these elements stop contributing after the first few seconds. The listener’s ear adapts and they disappear from perception.
Automation as the Engine of Texture Movement
Every texture layer should have at least one parameter in constant, subtle motion. Volume automation at the macro level creates breathing. Filter cutoff automation at the micro level creates constant timbral variation. Reverb send automation can make a texture feel like it is moving in space.
The rule of thumb used by experienced producers is that if you can loop a texture layer and it sounds identical on every repeat, it needs movement. Automation is the most direct solution.
LFO Modulation for Continuous Variation
Low-frequency oscillators applied to texture layer parameters create automatic, continuous movement that does not require manual automation. An LFO on filter cutoff with a rate of 0.1 Hz creates a slow, breathing filter sweep that the listener never fully registers consciously but always feels as aliveness.
Syncing LFO rates to musical subdivisions, quarters, halves, or bars, creates movement that aligns with the rhythmic feel of the track without being obviously mechanical.
Layering Textures That Evolve Together
The most sophisticated texture layering involves multiple elements that move in relationship to each other. An atmospheric layer that swells during the chorus while the pad layer thins out. A detail layer element that appears only in the second half of each verse. A rhythmic texture that subtly increases in density toward the end of each section.
This kind of coordinated texture evolution creates a sense of narrative in the production that goes beyond arrangement. The track feels like it is developing and growing even when the chord progression and drum pattern remain constant. This approach aligns directly with the principles of genre-bending music production, where sophisticated texture layering allows producers to navigate between genre territories fluidly.
Applying Texture Layering Across Different Genres
The principles of texture layering are universal. The application varies significantly across genres. Understanding how each genre uses texture is essential for applying these techniques in a way that sounds authentic rather than out of place.
Texture Layering in Afrobeat and Afrobeats
Afrobeat productions typically use dense rhythmic texture layers combined with organic atmospheric elements. The poly-rhythmic percussion tradition means that rhythmic textures can be highly complex without feeling cluttered, because each layer serves a distinct rhythmic function rooted in the tradition.
Harmonic textures in contemporary Afrobeats are typically warm and present in the mid-range, supporting the melodic lead without overwhelming it. Atmospheric layers often include organic room sound and outdoor ambience that reinforces the genre’s connection to live, communal performance.
Texture Layering in Trap Production
Trap texture layering is defined by contrast. Sparse, minimal arrangements with heavy, carefully chosen texture elements. The space between elements in trap is itself a texture, and pro trap producers are as deliberate about what they leave out as what they put in.
Atmospheric layers in trap often lean toward dark, claustrophobic textures: filtered noise, reversed elements, and long reverb tails that create a sense of spatial unease. Harmonic layers are typically simple and suspended to keep the emotional weight on the rhythmic and bass elements.
Texture Layering in Amapiano
Amapiano relies heavily on both harmonic and rhythmic texture layering. The genre’s signature log drum sound is itself a textural instrument, providing mid-bass rhythmic texture that occupies a unique zone between percussion and bass. Piano chords serve both harmonic and rhythmic texture functions simultaneously.
Atmospheric layers in amapiano are typically warmer and more organic than in trap, often including subtle vinyl and room character textures that reinforce the genre’s organic, communal feel. The amapiano log drums mixing guide covers how this central textural element is crafted and placed in a professional amapiano production.
Start Applying Texture Layering in Your Next Session
Texture layering is not an advanced technique reserved for producers with years of experience. It is a disciplined approach to sound that any producer can begin applying immediately with the tools already in their sessions.
Start with the foundation. Map your frequency zones. Add one harmonic layer with intentional voicing. Add one atmospheric layer and let it breathe. Add movement to everything. Check your frequency separation. Refine from there.
The producers who master texture layering do not make busier music. They make richer music. Every layer you add should serve the emotional intent of the track and nothing else. Apply that standard consistently and your productions will begin to carry the depth and dimension that separates professional releases from bedroom demos.
Texture layering is your most powerful tool for turning good ideas into great records. Use it with intention on every session from today forward.
The tracks that stay with listeners for years are not the loudest or the most complex. They are the most textured. Build layers that reward attention and you build music that lasts.
FAQ: Texture Layering
What is texture layering in music production?
Texture layering is the practice of combining multiple sound elements, each serving a specific frequency, spatial, or psychological function, to create a composite sonic environment that is richer, deeper, and more engaging than any single element could produce on its own. It is the primary technique professional producers use to give their tracks depth, warmth, and the quality of rewarding repeated listening.
How many layers should a professional production have?
There is no fixed number. Professional productions range from three or four carefully chosen layers to twenty or more, depending on the genre and the emotional intent of the track. What matters is not the count but the intention behind each layer. Every element should serve a specific function. A minimal production with five intentional layers will outperform a dense production with twenty thoughtless ones every time.
What is the most common texture layering mistake producers make?
The most common mistake is adding layers without frequency separation. Two sounds competing for the same frequency zone cancel each other out and create mud rather than richness. The second most common mistake is adding static layers that do not move or evolve. A non-moving texture disappears from perception within seconds. Both mistakes are solved by systematic high-pass filtering and intentional automation.
How does texture layering differ from sound design?
Sound design is the creation and shaping of individual sounds. Texture layering is the practice of combining and arranging those sounds to create a composite sonic environment. Sound design operates at the single-element level. Texture layering operates at the full-session level. The two disciplines are deeply connected: great sound design gives you better raw materials for texture layering, and great texture layering reveals the full potential of well-designed sounds.
Can texture layering be applied in any genre?
Yes. The specific sounds, density, and character of texture layers vary significantly across genres, but the fundamental principles apply universally. Every genre benefits from intentional frequency separation, movement in texture elements, a solid foundation before any layers are added, and detail layers that reward repeated listening. The application is genre-specific. The discipline is universal.
How do I avoid making my mix muddy when using texture layering?
Frequency separation is the primary defense against mud. High-pass filter every element that does not need low-frequency content. Use mid-side processing to keep low-end content mono while texture layers spread in the stereo field. Ensure no two layers compete for the same frequency zone. Regularly reference your mix in mono to catch frequency conflicts that stereo monitoring can mask. The sidechain compression advanced guide also covers dynamic separation techniques that keep layered elements from building up and clashing.
How do I develop my own texture layering signature style?
Consistency is the foundation of a signature style. Choose two or three specific texture layer approaches that define your aesthetic and apply them across every production. It might be a particular type of atmospheric sample combined with a specific approach to pad voicing, or a characteristic rhythmic texture element that appears in all your tracks. Over time, these consistent choices accumulate into a recognizable sound identity. The guide to creating signature sounds walks through this process in detail.